Freenas Ftp Cannot Create Folder but Can Upload
13. Services
Services that ship with FreeNAS® are configured, started, or stopped in Services. FreeNAS® includes these built-in services:
- AFP
- Dynamic DNS
- FTP
- iSCSI
- LLDP
- NFS
- Rsync
- S3
- S.M.A.R.T.
- SMB
- SNMP
- SSH
- TFTP
- UPS
- WebDAV
This section demonstrates starting a FreeNAS® service and the available configuration options for each FreeNAS® service.
13.1. Configure Services
The Services page, shown in Figure 13.1.1, lists all services. The list has options to activate the service, set a service to Start Automatically at arrangement boot, and configure a service. The S.G.A.R.T. service is enabled by default, but merely runs if the storage devices support South.M.A.R.T. data. Other services default to off until started.
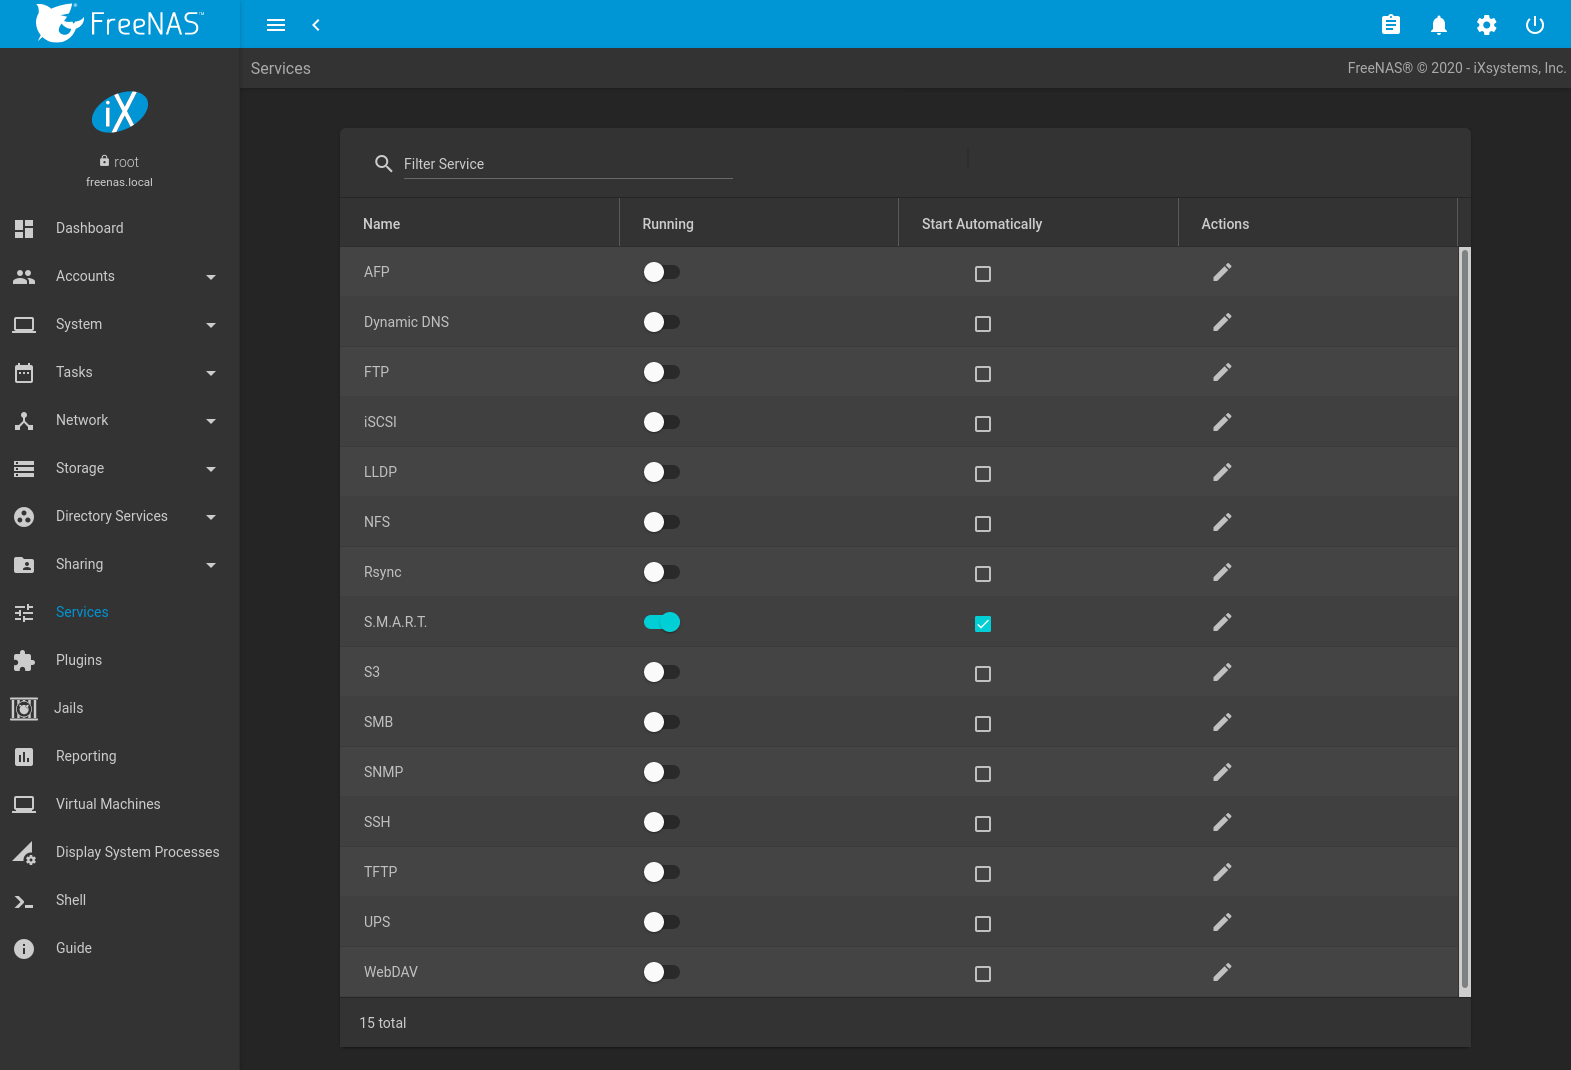
Fig. thirteen.1.1 Configure Services
Stopped services bear witness the sliding button on the left. Active services evidence the sliding button on the right. Click the slider to start or stop a service. Stopping a service shows a confirmation dialog.
Tip
Using a proxy server tin can prevent the list of services from being displayed. If a proxy server is used, do non configure it to proxy local network or websocket connections. VPN software can besides cause bug. If the listing of services is displayed when connecting on the local network but not when connecting through the VPN, check the VPN software configuration.
Services are configured by clicking (Configure).
If a service does not start, become to and enable Show panel letters. Panel letters appear at the bottom of the browser. Clicking the console bulletin surface area makes information technology into a pop-up window, allowing scrolling through or copying the messages. Watch these messages for errors when stopping or starting the problematic service.
To read the organization logs for more information about a service failure, open up Shell and type more /var/log/letters.
13.2. AFP
The settings that are configured when creating AFP shares in are specific to each configured AFP share. An AFP share is created by navigating to , and clicking Add together. In dissimilarity, global settings which apply to all AFP shares are configured in .
Figure thirteen.2.1 shows the bachelor global AFP configuration options which are described in Table 13.2.1.
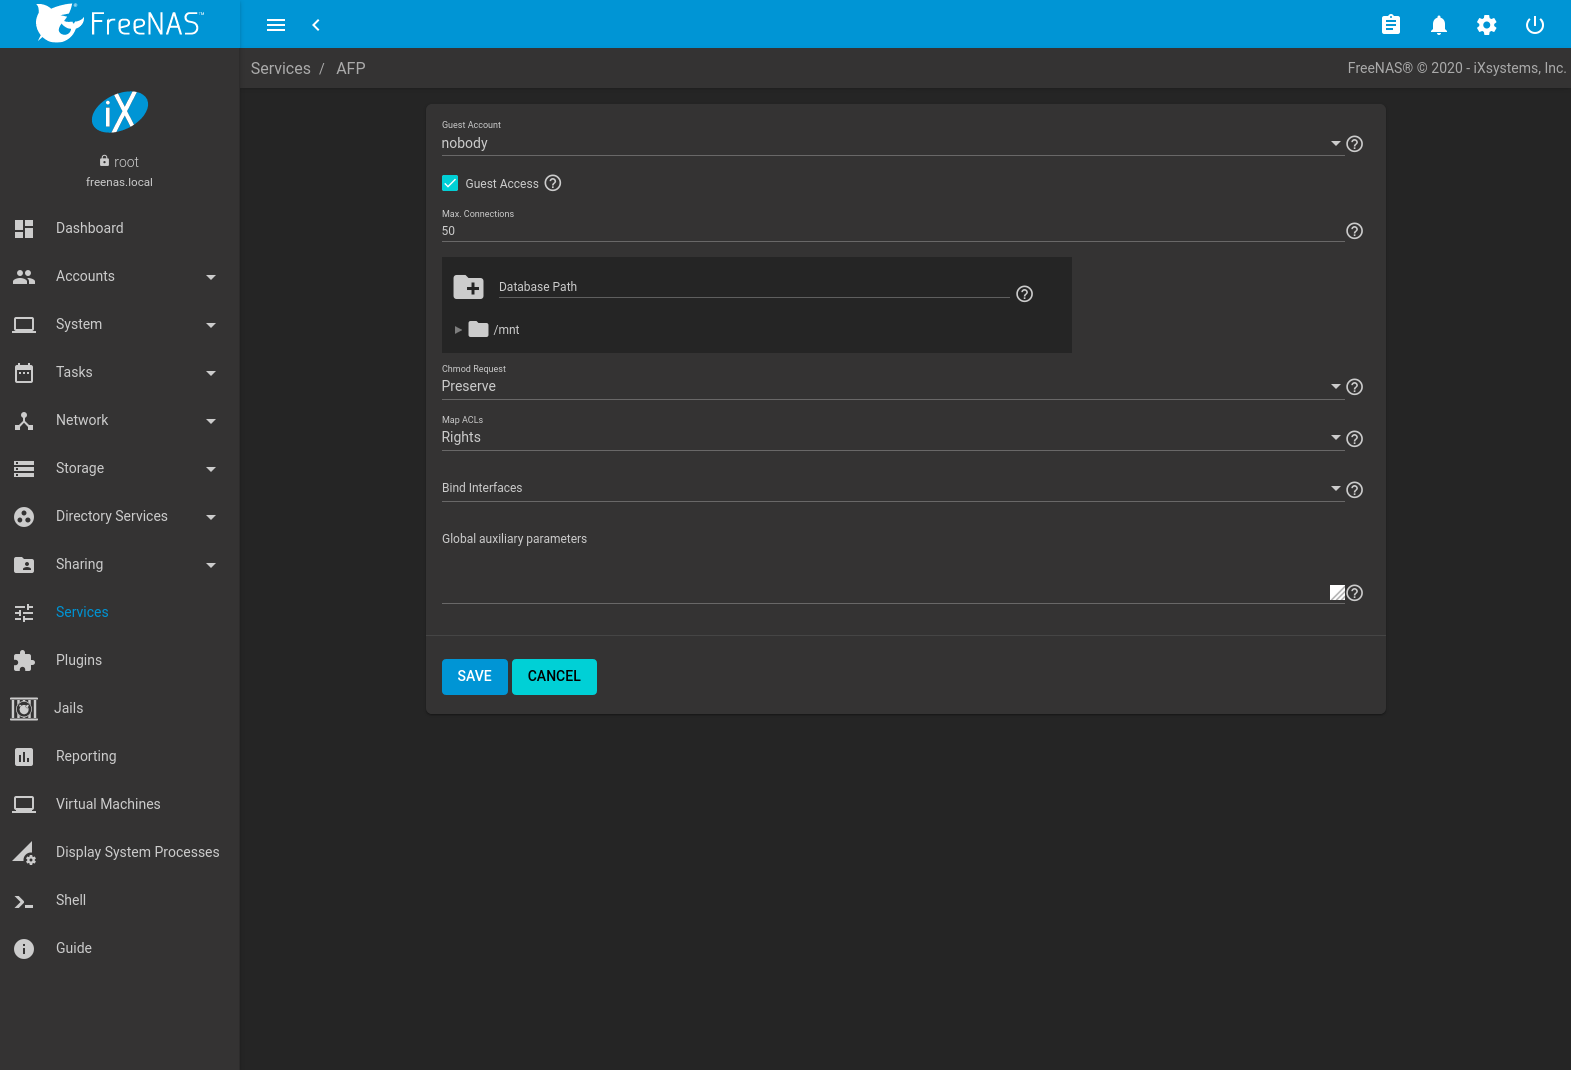
Fig. 13.2.1 Global AFP Configuration
| Setting | Value | Description |
|---|---|---|
| Invitee Account | drop-downward card | Select an account to use for guest admission. The account must have permissions to the pool or dataset being shared. |
| Guest Access | checkbox | If enabled, clients are not prompted to cosign before accessing AFP shares. |
| Max. Connections | integer | Maximum number of simultaneous connections permited via AFP. The default limit is l. |
| Database Path | scan push button | Sets the database information to be stored in the path. Default is the root of the pool. The path must be writable fifty-fifty if the pool is read only. |
| Chmod Request | drop-down menu | Set how ACLs are handled. Choices are: Ignore, Preserve, or Uncomplicated. |
| Map ACLs | drop-down carte | Cull mapping of effective permissions for authenticated users: Rights (default, Unix-style permissions), Fashion (ACLs), or None. |
| Demark Interfaces | pick | Specify the IP addresses to heed for FTP connections. Select the desired IP addresses in the list to add them to the Demark Interfaces list. |
| Global auxiliary parameters | cord | Additional afp.conf(5) parameters not covered elsewhere in this screen. |
13.ii.1. Troubleshooting AFP
Check for error messages in /var/log/afp.log .
Determine which users are connected to an AFP share by typing afpusers.
If Something wrong with the volume'due south CNID DB is shown, run this control from Shell, replacing the path to the problematic AFP share:
This control tin take some time, depending upon the size of the pool or dataset existence shared. The CNID database is wiped and rebuilt from the CNIDs stored in the AppleDouble files.
13.iii. Dynamic DNS
Dynamic DNS (DDNS) is useful if the FreeNAS® system is connected to an ISP that periodically changes the IP address of the system. With dynamic DNS, the system can automatically associate its current IP accost with a domain proper name, allowing access to the FreeNAS® system even if the IP address changes. DDNS requires registration with a DDNS service such as DynDNS.
Figure 13.three.one shows the DDNS configuration screen and Table xiii.iii.1 summarizes the configuration options. The values for these fields are provided by the DDNS provider. Later configuring DDNS, call up to kickoff the DDNS service in .
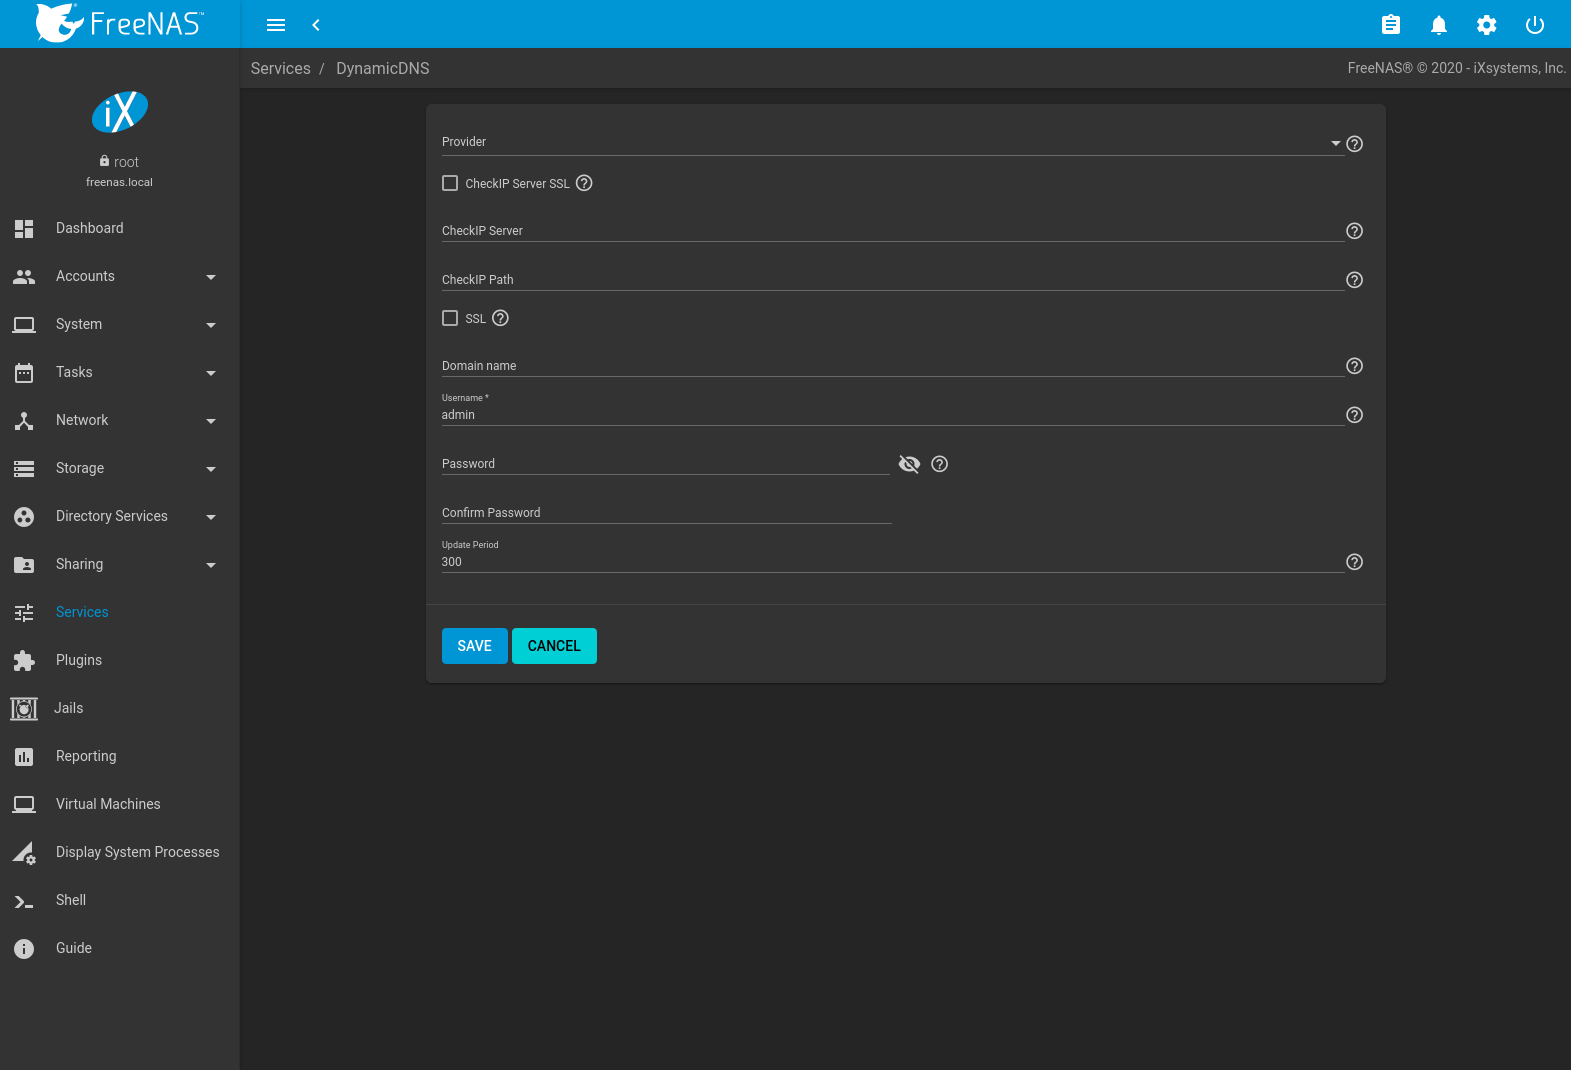
Fig. 13.3.i Configuring DDNS
| Setting | Value | Description |
|---|---|---|
| Provider | drop-down carte du jour | Several providers are supported. If a specific provider is not listed, select Custom Provider and enter the data in the Custom Server and Custom Path fields. |
| CheckIP Server SSL | checkbox | Use HTTPS for the connection to the CheckIP Server. |
| CheckIP Server | string | Proper noun and port of the server that reports the external IP address. For example, entering checkip.dyndns.org:80 uses Dyn IP detection to discover the remote socket IP address. |
| CheckIP Path | string | Path to the CheckIP Server. For case, no-ip.com uses a CheckIP Server of dynamic.zoneedit.com and CheckIP Path of /checkip.html . |
| SSL | checkbox | Use HTTPS for the connection to the server that updates the DNS record. |
| Custom Server | string | DDNS server name. For example, members.dyndns.org denotes a server similar to dyndns.org. |
| Custom Path | cord | DDNS server path. Path syntax varies past provider and must be obtained from that provider. For instance, /update?hostname= is a simple path for the update.twodns.de Custom Server. The hostname is automatically appended by default. More examples are in the In-A-Dyn documentation. |
| Domain name | cord | Fully qualified domain proper name of the host with the dynamic IP addess. Split multiple domains with a space, comma ( , ), or semicolon ( ; ). Instance: myname.dyndns.org; myothername.dyndns.org |
| Username | string | Username for logging in to the provider and updating the record. |
| Countersign | cord | Password for logging in to the provider and updating the record. |
| Update period | integer | How oft the IP is checked in seconds. |
When using the he.net Provider, enter the domain name for Username and enter the DDNS fundamental generated for that domain's A entry at the he.net website for Password.
13.iv. FTP
FreeNAS® uses the proftpd FTP server to provide FTP services. In one case the FTP service is configured and started, clients tin can scan and download data using a web browser or FTP client software. The advantage of FTP is that like shooting fish in a barrel-to-use cantankerous-platform utilities are bachelor to manage uploads to and downloads from the FreeNAS® system. The disadvantage of FTP is that it is considered to exist an insecure protocol, pregnant that information technology should not exist used to transfer sensitive files. If concerned nigh sensitive data, come across Encrypting FTP.
This section provides an overview of the FTP configuration options. It so provides examples for configuring bearding FTP, specified user admission inside a chroot environment, encrypting FTP connections, and troubleshooting tips.
Figure 13.iv.i shows the configuration screen for . Some settings are but available in Advanced MODE. To encounter these settings, either click the ADVANCED Fashion push button or configure the organisation to ever display these settings by setting the Prove advanced fields by default selection in .

Fig. 13.4.ane Configuring FTP
Table thirteen.four.1 summarizes the available options when configuring the FTP server.
| Setting | Value | Advanced Mode | Clarification |
|---|---|---|---|
| Port | integer | Set the port the FTP service listens on. | |
| Clients | integer | Maximum number of simultaneous clients. | |
| Connections | integer | Ready the maximum number of connections per IP address. 0 ways unlimited. | |
| Login Attempts | integer | Enter the maximum number of attempts before the client is disconnected. Increase this if users are prone to typos. | |
| Timeout | integer | Maximum client idle time in seconds before client is disconnected. | |
| Allow Root Login | checkbox | Setting this choice is discouraged every bit it increases security risk. | |
| Allow Bearding Login | checkbox | Allow anonymous FTP logins with access to the directory specified in the Path. | |
| Path | scan push button | Set the root directory for anonymous FTP connections. | |
| Allow Local User Login | checkbox | Permit whatever local user to log in. Past default, only members of the ftp group are allowed to log in. | |
| Display Login | string | Specify the message displayed to local login users after authentication. Non displayed to bearding login users. | |
| Allow Transfer Resumption | checkbox | Set to allow FTP clients to resume interrupted transfers. | |
| Always Chroot | checkbox | When gear up a local user is merely immune admission to their abode directory when they are a member of the wheel grouping. | |
| Perform Reverse DNS Lookups | checkbox | Set to perform reverse DNS lookups on client IPs. Can cause long delays if reverse DNS is non configured. | |
| Masquerade address | string | Public IP accost or hostname. Prepare if FTP clients cannot connect through a NAT device. | |
| Certificate | drop-down bill of fare | Select the SSL document to be used for TLS FTP connections. Become to to create a document. | |
| TLS No Certificate Request | checkbox | Ready if the client cannot connect, and it is suspected the client is not properly handling server document requests. | |
| File Permission | checkboxes | ✓ | Sets default permissions for newly created files. |
| Directory Permission | checkboxes | ✓ | Sets default permissions for newly created directories. |
| Enable FXP | checkbox | ✓ | Set up to enable the File eXchange Protocol. This is discouraged as it makes the server vulnerable to FTP bounce attacks. |
| Require IDENT Authentication | checkbox | ✓ | Setting this option results in timeouts if identd is not running on the client. |
| Minimum Passive Port | integer | ✓ | Used by clients in PASV way, default of 0 means any port above 1023. |
| Maximum Passive Port | integer | ✓ | Used past clients in PASV mode, default of 0 means any port higher up 1023. |
| Local User Upload Bandwidth | integer | ✓ | Defined in KiB/southward, default of 0 ways unlimited. |
| Local User Download Bandwidth | integer | ✓ | Defined in KiB/s, default of 0 means unlimited. |
| Anonymous User Upload Bandwidth | integer | ✓ | Divers in KiB/s, default of 0 means unlimited. |
| Anonymous User Download Bandwidth | integer | ✓ | Defined in KiB/s, default of 0 means unlimited. |
| Enable TLS | checkbox | ✓ | Set to enable encrypted connections. Requires a certificate to exist created or imported using Certificates. |
| TLS Policy | drop-downward menu | ✓ | The selected policy defines whether the control channel, data channel, both channels, or neither channel of an FTP session must occur over SSL/TLS. The policies are described hither. |
| TLS Allow Customer Renegotiations | checkbox | ✓ | Setting this option is not recommended as it breaks several security measures. For this and the residue of the TLS fields, refer to mod_tls for more details. |
| TLS Let Dot Login | checkbox | ✓ | If gear up, the user home directory is checked for a .tlslogin file which contains one or more than PEM-encoded certificates. If non found, the user is prompted for countersign authentication. |
| TLS Allow Per User | checkbox | ✓ | If prepare, the user password may be sent unencrypted. |
| TLS Mutual Name Required | checkbox | ✓ | When set, the common proper noun in the certificate must match the FQDN of the host. |
| TLS Enable Diagnostics | checkbox | ✓ | If set up when troubleshooting a connection, logs more than verbosely. |
| TLS Export Document Data | checkbox | ✓ | If set, exports the certificate surroundings variables. |
| TLS No Certificate Request | checkbox | ✓ | Prepare if the customer cannot connect and it is suspected the client is poorly handling the server certificate request. |
| TLS No Empty Fragments | checkbox | ✓ | Setting this option is not recommended equally it bypasses a security machinery. |
| TLS No Session Reuse Required | checkbox | ✓ | Setting this option reduces the security of the connection. Just use if the customer does non empathise reused SSL sessions. |
| TLS Export Standard Vars | checkbox | ✓ | If enabled, sets several surround variables. |
| TLS DNS Name Required | checkbox | ✓ | If ready, the client DNS name must resolve to its IP accost and the cert must contain the same DNS proper noun. |
| TLS IP Address Required | checkbox | ✓ | If ready, the client document must contain the IP accost that matches the IP accost of the client. |
| Auxiliary Parameters | cord | ✓ | Used to add together proftpd(8) parameters not covered elsewhere in this screen. |
This example demonstrates the auxiliary parameters that prevent all users from performing the FTP DELETE command:
<Limit DELE> DenyAll </Limit> 13.4.1. Bearding FTP
Anonymous FTP may exist advisable for a pocket-sized network where the FreeNAS® organization is not attainable from the Net and everyone in the internal network needs easy access to the stored information. Anonymous FTP does not require a user business relationship for every user. In improver, passwords are not required and so information technology is non necessary to manage changed passwords on the FreeNAS® arrangement.
To configure anonymous FTP:
-
Give the born ftp user account permissions to the pool or dataset to be shared in :
- User: select the built-in ftp user from the drop-down card
- Group: select the built-in ftp group from the drop-downwards menu
- Mode: review that the permissions are appropriate for the share
Note
For FTP, the type of client does not matter when it comes to the type of ACL. This ways that Unix ACLs are used even if Windows clients are accessing FreeNAS® via FTP.
-
Configure anonymous FTP in by setting these attributes:
- Permit Anonymous Login: gear up this option
- Path: browse to the pool/dataset/directory to be shared
-
Start the FTP service in . Click the sliding button on the FTP row. The FTP service takes a second or so to start. The sliding push button moves to the right when the service is running.
-
Test the connection from a client using a utility such as Filezilla.
In the instance shown in Figure 13.4.2, The user has entered this data into the Filezilla client:
- IP accost of the FreeNAS® server: 192.168.1.113
- Username: bearding
- Countersign: the email accost of the user

Fig. 13.iv.2 Connecting Using Filezilla
The messages inside the client indicate the FTP connection is successful. The user tin now navigate the contents of the root folder on the remote site. This is the pool or dataset specified in the FTP service configuration. The user can also transfer files betwixt the local site (their organization) and the remote site (the FreeNAS® system).
xiii.iv.2. FTP in chroot
If users are required to authenticate earlier accessing the data on the FreeNAS® system, either create a user account for each user or import existing user accounts using Agile Directory or LDAP. Create a ZFS dataset for each user, then chroot each user so they are limited to the contents of their ain home directory. Datasets provide the added benefit of configuring a quota so that the size of a user dwelling house directory is limited to the size of the quota.
To configure this scenario:
-
Create a ZFS dataset for each user in . Click the (Options) button, so Add Dataset. Set an appropriate quota for each dataset. Repeat this process to create a dataset for every user that needs access to the FTP service.
-
When Active Directory or LDAP are not being used, create a user account for each user past navigating to , and clicking ADD. For each user, browse to the dataset created for that user in the Home Directory field. Repeat this process to create a user account for every user that needs access to the FTP service, making certain to assign each user their own dataset.
-
Set the permissions for each dataset past navigating to , and clicking the (Options) on the desired dataset. Click the Edit Permissions button, and so assign a user account as User of that dataset. Set the desired permissions for that user. Repeat for each dataset.
Note
For FTP, the type of client does non matter when it comes to the blazon of ACL. This means Unix ACLs are e'er used, even if Windows clients will exist accessing FreeNAS® via FTP.
-
Configure FTP in with these attributes:
- Path: browse to the parent pool containing the datasets.
- Make sure the options for Allow Root Login and Allow Anonymous Login are unselected.
- Select the Allow Local User Login selection to enable it.
- Select the Ever Chroot option to enable information technology.
-
Start the FTP service in . Click the sliding button on the FTP row. The FTP service takes a second or so to first. The sliding button moves to the right to show the service is running.
-
Test the connection from a client using a utility such equally Filezilla.
To examination this configuration in Filezilla, use the IP address of the FreeNAS® system, the Username of a user that is associated with a dataset, and the Password for that user. The messages volition indicate the say-so and the FTP connexion are successful. The user tin now navigate the contents of the root folder on the remote site. This time information technology is non the entire pool only the dataset created for that user. The user can transfer files between the local site (their system) and the remote site (their dataset on the FreeNAS® system).
13.iv.3. Encrypting FTP
To configure any FTP scenario to use encrypted connections:
- Import or create a certificate authority using the instructions in CAs. Then, import or create the document to apply for encrypted connections using the instructions in Certificates.
- In , click ADVANCED, choose the document in Certificate, and prepare the Enable TLS choice.
- Specify secure FTP when accessing the FreeNAS® arrangement. For instance, in Filezilla enter ftps://IP_address (for an implicit connection) or ftpes://IP_address (for an explicit connectedness) as the Host when connecting. The showtime time a user connects, they will be presented with the certificate of the FreeNAS® system. Click SAVE to accept the certificate and negotiate an encrypted connectedness.
- To forcefulness encrypted connections, select On for the TLS Policy.
13.iv.4. Troubleshooting FTP
The FTP service will not get-go if information technology cannot resolve the system hostname to an IP address with DNS. To come across if the FTP service is running, open Shell and issue the command:
If at that place is nothing listening on port 21, the FTP service is not running. To run across the error bulletin that occurs when FreeNAS® tries to start the FTP service, go to , enable Evidence panel messages, and click SAVE. Become to Services and switch the FTP service off, then back on. Lookout the console messages at the bottom of the browser for errors.
If the error refers to DNS, either create an entry in the local DNS server with the FreeNAS® arrangement hostname and IP accost, or add an entry for the IP address of the FreeNAS® system in the Host name database field.
13.5. iSCSI
Refer to Cake (iSCSI) for instructions on configuring iSCSI. Starting time the iSCSI service in past clicking the sliding push button in the iSCSI row.
Note
A warning message is shown the iSCSI service stops when initiators are continued. Open the Beat out and type ctladm islist to determine the names of the connected initiators.
13.half dozen. LLDP
The Link Layer Discovery Protocol (LLDP) is used by network devices to advertise their identity, capabilities, and neighbors on an Ethernet network. FreeNAS® uses the ladvd LLDP implementation. If the network contains managed switches, configuring and starting the LLDP service will tell the FreeNAS® organisation to annunciate itself on the network.
Effigy 13.6.1 shows the LLDP configuration screen and Table 13.6.1 summarizes the configuration options for the LLDP service.
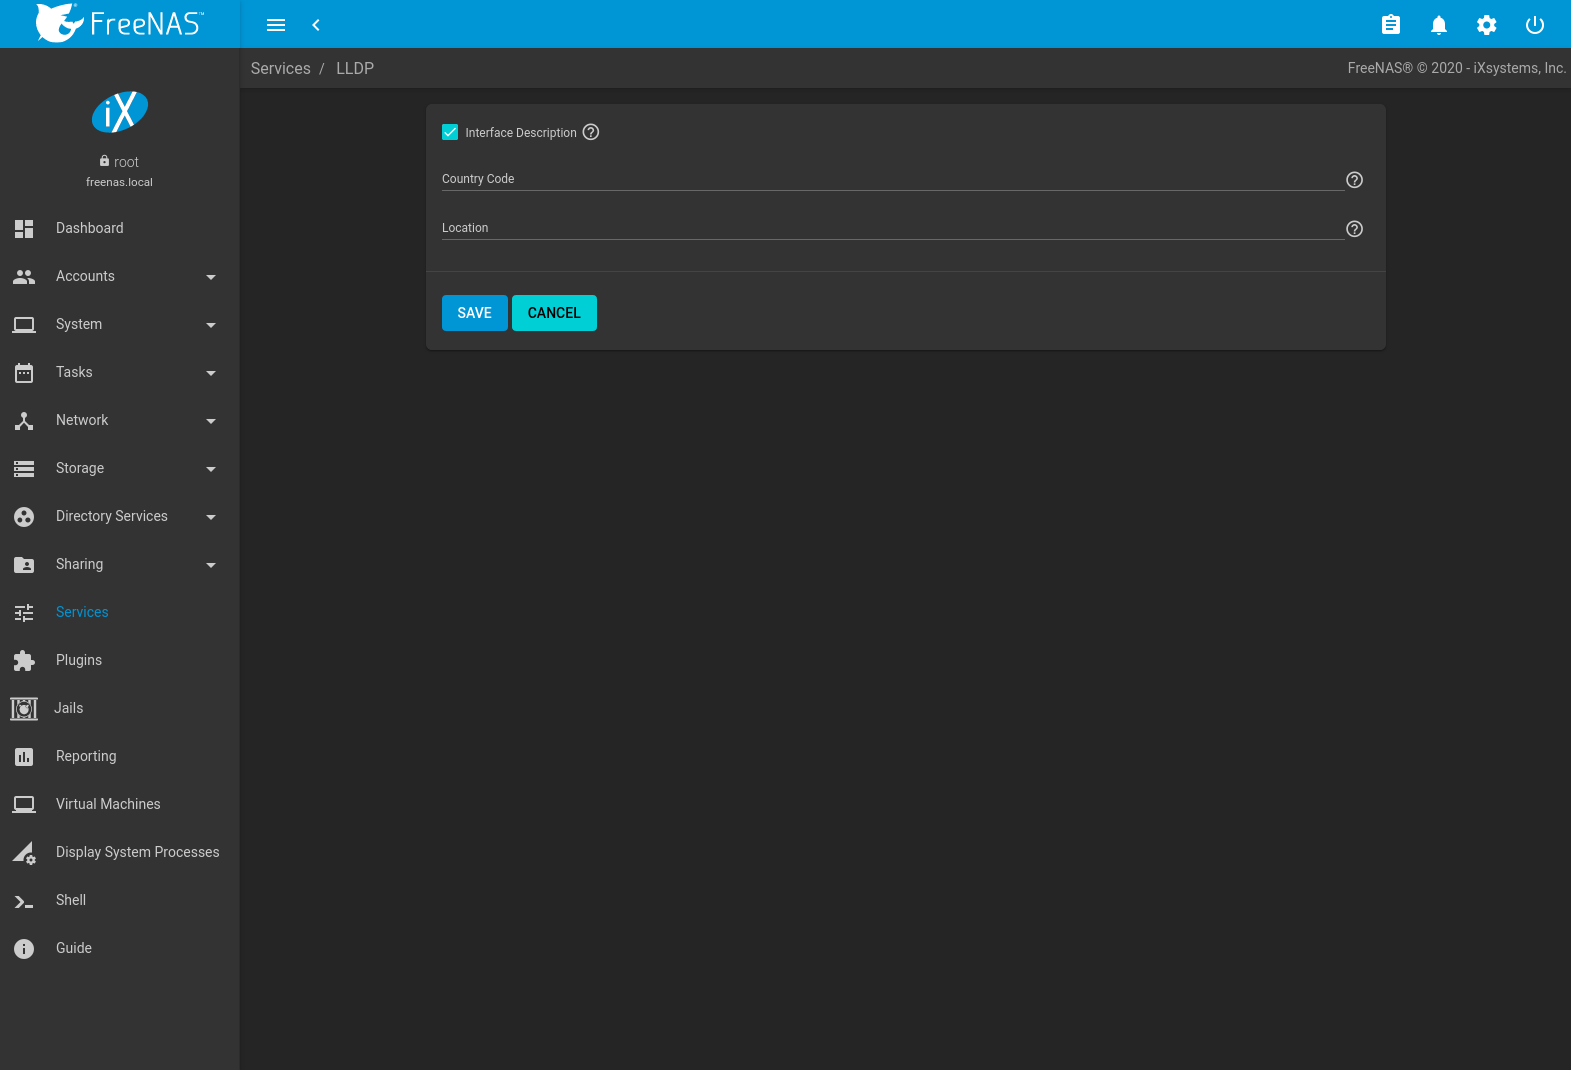
Fig. 13.6.i Configuring LLDP
| Setting | Value | Clarification |
|---|---|---|
| Interface Description | checkbox | Set to enable receive mode and to salvage and received peer information in interface descriptions. |
| Country Code | string | Required for LLDP location back up. Enter a two-letter ISO 3166 country code. |
| Location | string | Optional. Specify the physical location of the host. |
13.vii. NFS
The settings that are configured when creating NFS shares in are specific to each configured NFS share. An NFS share is created past going to and clicking Add together. Global settings which utilise to all NFS shares are configured in .
Figure 13.7.1 shows the configuration screen and Table 13.7.1 summarizes the configuration options for the NFS service.
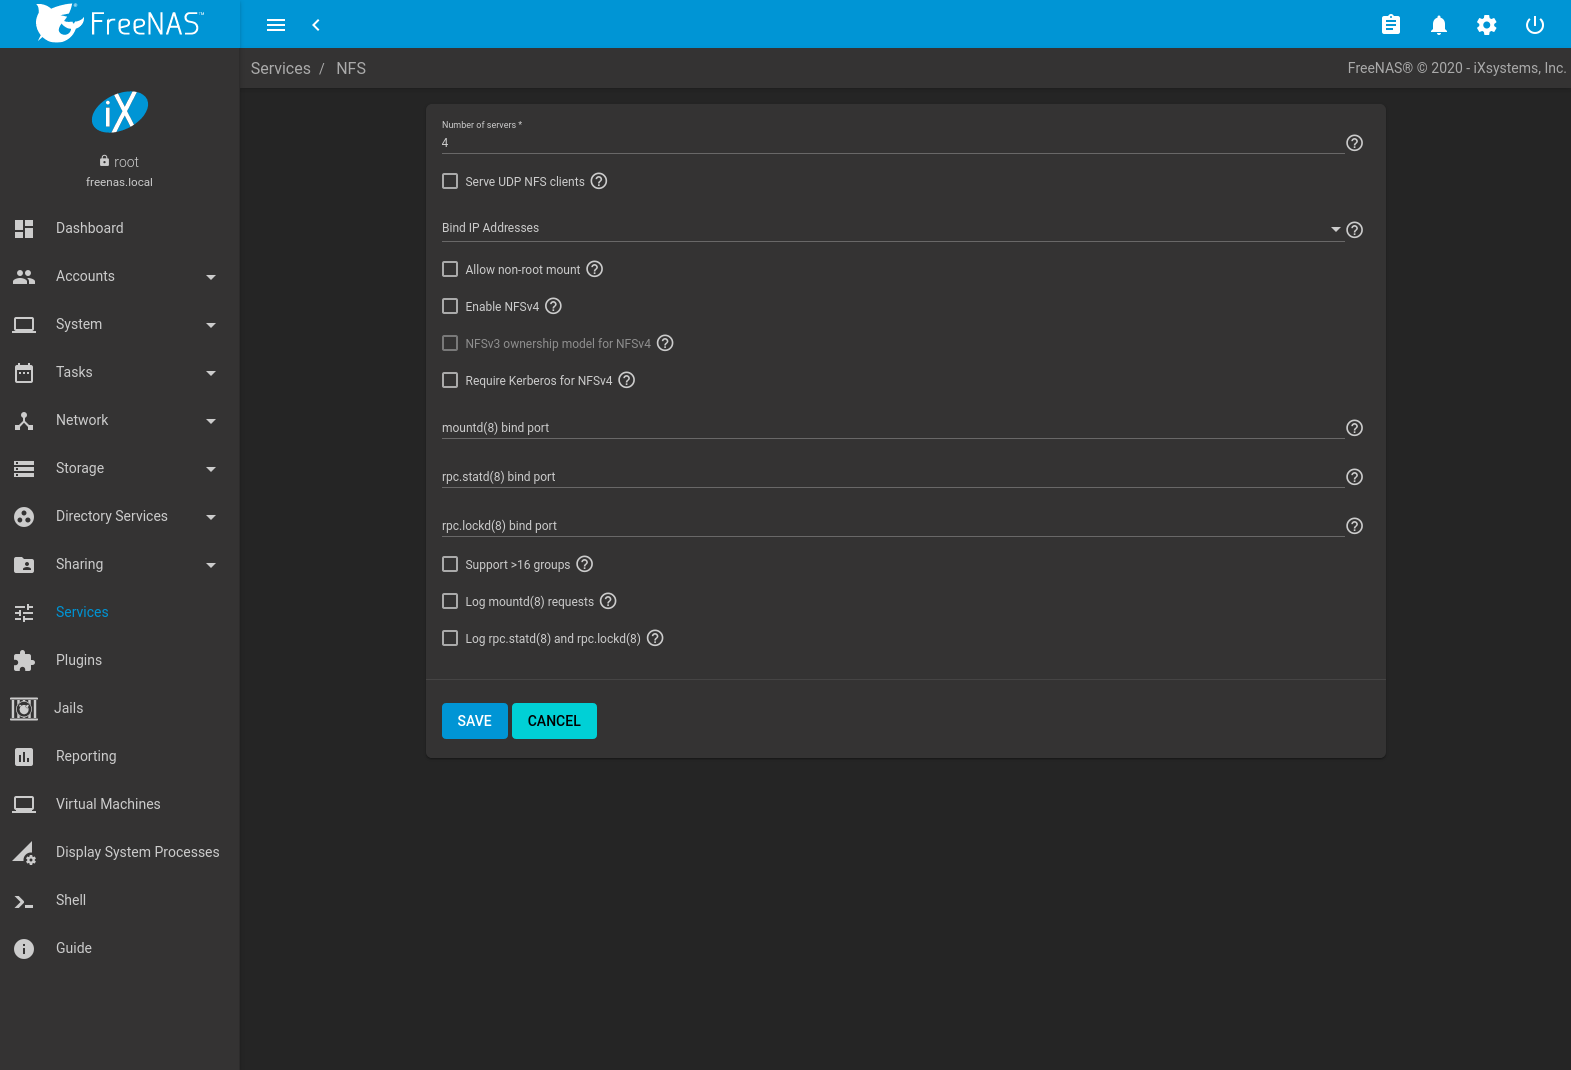
Fig. 13.7.one Configuring NFS
| Setting | Value | Description |
|---|---|---|
| Number of servers | integer | Specify how many servers to create. Increase if NFS customer responses are slow. To limit CPU context switching, keep this number less than or equal to the number of CPUs reported by sysctl -n kern.smp.cpus . |
| Serve UDP NFS clients | checkbox | Set if NFS clients demand to use UDP. |
| Bind IP Addresses | drop-downward | Select IP addresses to heed on for NFS requests. When all options are unset, NFS listens on all available addresses. |
| Allow not-root mount | checkbox | Gear up only if required by the NFS customer. |
| Enable NFSv4 | checkbox | Gear up to switch from NFSv3 to NFSv4. The default is NFSv3. |
| NFSv3 ownership model for NFSv4 | checkbox | Grayed out unless Enable NFSv4 is selected and, in turn, grays out Support>16 groups which is incompatible. Set this option if NFSv4 ACL support is needed without requiring the customer and the server to sync users and groups. |
| Require Kerberos for NFSv4 | checkbox | Gear up to force NFS shares to fail if the Kerberos ticket is unavailable. |
| mountd(8) demark port | integer | Optional. Specify the port that mountd(eight) binds to. |
| rpc.statd(viii) bind port | integer | Optional. Specify the port that rpc.statd(8) binds to. |
| rpc.lockd(8) bind port | integer | Optional. Specify the port that rpc.lockd(viii) binds to. |
| Support >xvi groups | checkbox | Set this option if any users are members of more than than 16 groups (useful in AD environments). Note this assumes group membership is configured correctly on the NFS server. |
| Log mountd(eight) requests | checkbox | Enable logging of mountd(8) requests by syslog. |
| Log rpc.statd(8) and rpc.lockd(eight) | checkbox | Enable logging of rpc.statd(8) and rpc.lockd(viii) requests by syslog. |
Note
NFSv4 sets all ownership to nobody:nobody if user and group do non lucifer on client and server.
xiii.8. Rsync
is used to configure an rsync server when using rsync module mode. Refer to Rsync Module Fashion for a configuration example.
This department describes the configurable options for the rsyncd service and rsync modules.
13.viii.1. Configure Rsyncd
To configure the rsyncd server, go to and click EDIT for the Rsync service.
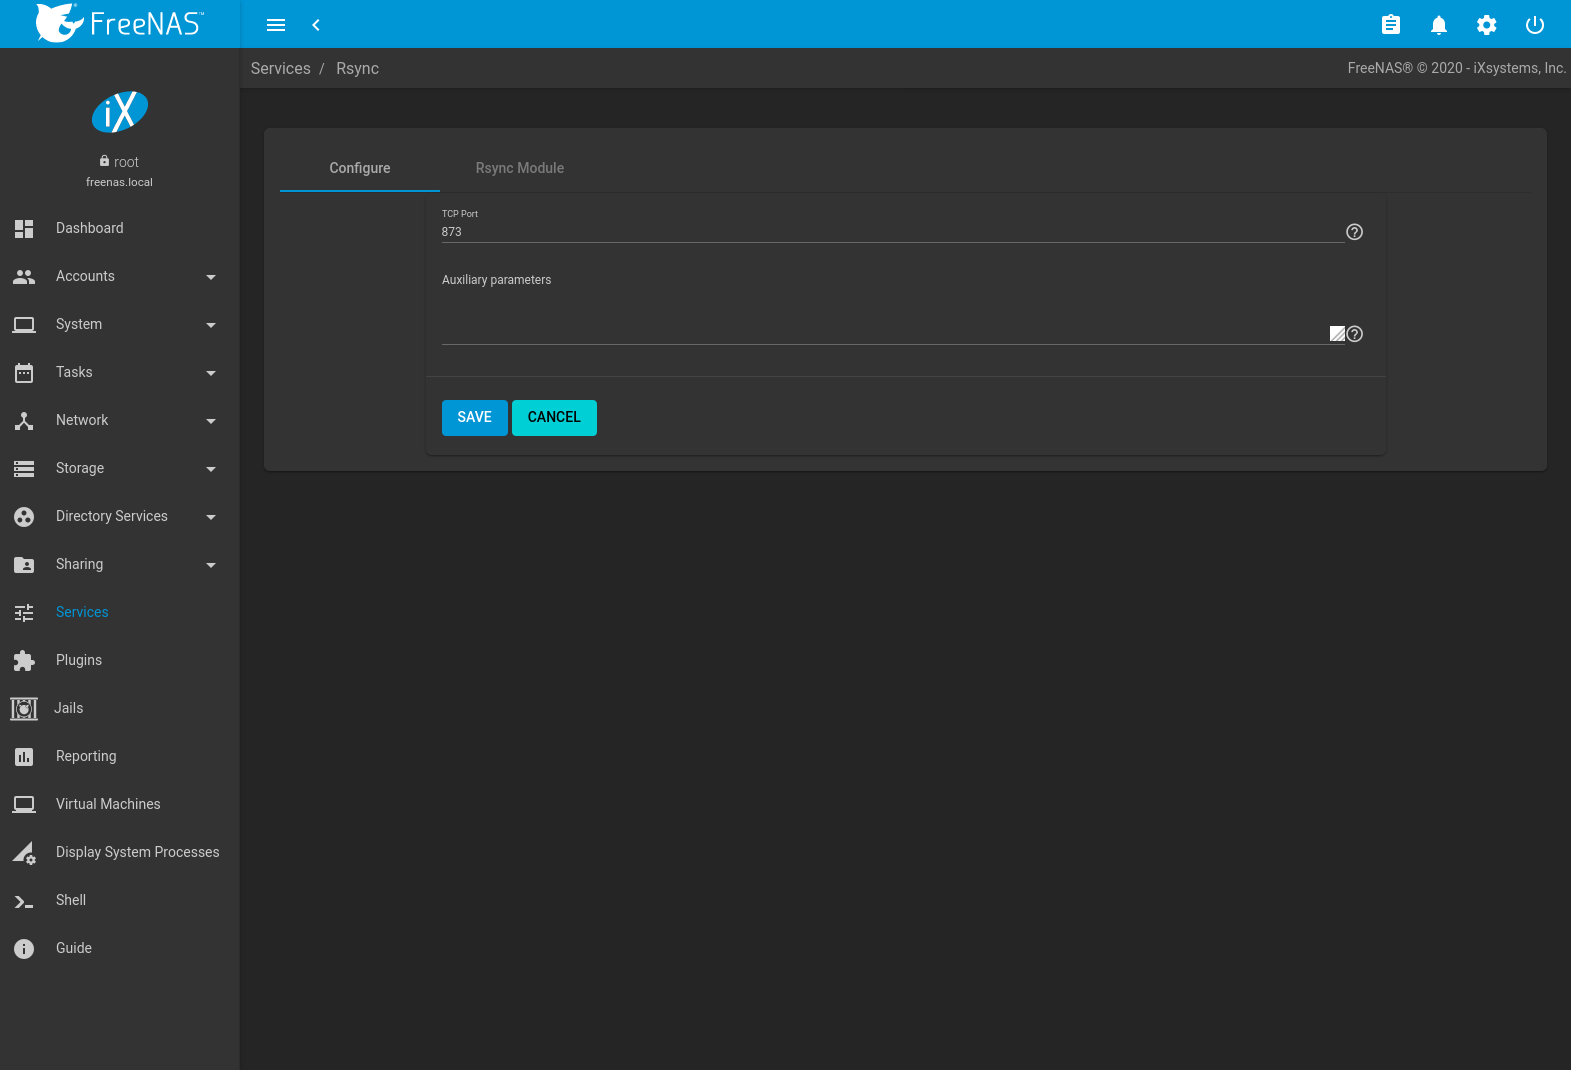
Fig. 13.viii.1 Rsyncd Configuration
Table xiii.8.1 summarizes the configuration options for the rsync daemon:
| Setting | Value | Clarification |
|---|---|---|
| TCP Port | integer | rsyncd listens on this port. The default is 873. |
| Auxiliary parameters | string | Enter whatsoever additional parameters from rsyncd.conf(v). |
xiii.8.two. Rsync Modules
To add a new Rsync module, go to , click EDIT for the Rsync service, select the Rsync Module tab, and click ADD.
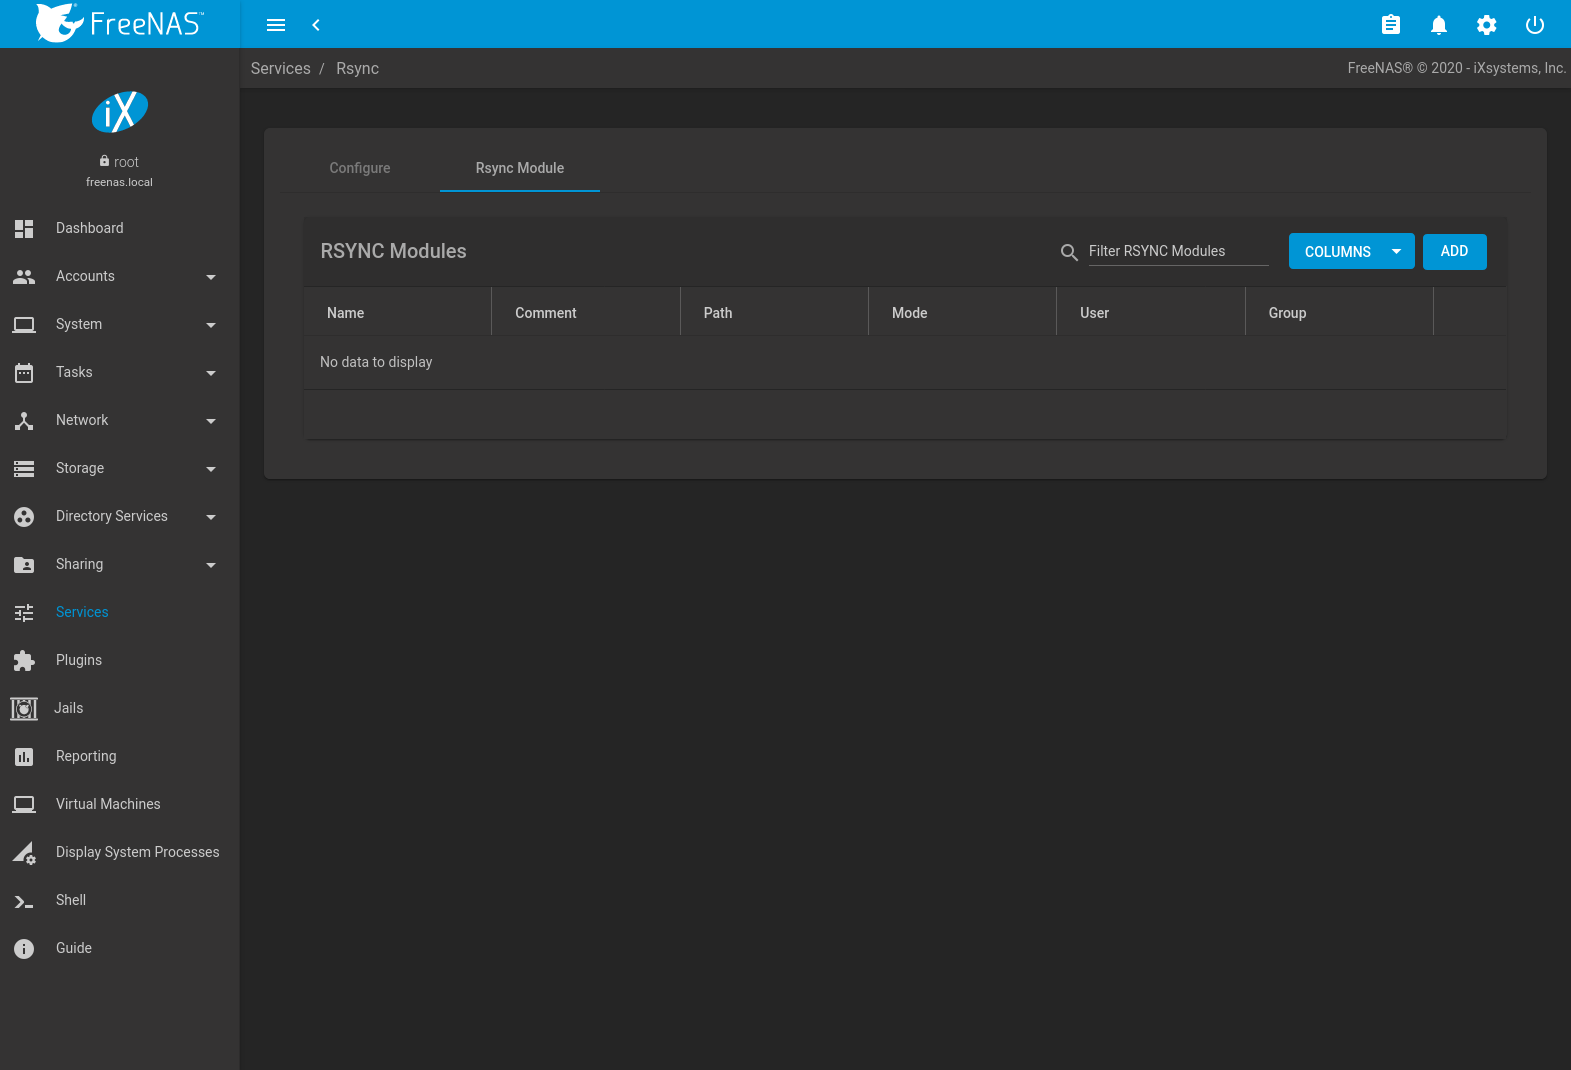
Fig. xiii.8.two Adding an Rsync Module
Table 13.8.2 summarizes the configuration options available when creating a rsync module.
| Setting | Value | Description |
|---|---|---|
| Name | string | Module name that matches the proper name requested by the rsync client. |
| Annotate | string | Describe this module. |
| Path | file browser | Browse to the pool or dataset to shop received data. |
| Access Mode | driblet-down bill of fare | Choose permissions for this rsync module. |
| Maximum connections | integer | Maximum connections to this module. 0 is unlimited. |
| User | drib-down menu | User to run as during file transfers to and from this module. |
| Group | driblet-down menu | Group to run as during file transfers to and from this module. |
| Hosts Permit | cord | From rsyncd.conf(5). A listing of patterns to match with the hostname and IP address of a connecting client. The connection is rejected if no patterns friction match. Dissever patterns with whitespace or a comma. |
| Hosts Deny | string | From rsyncd.conf(5). A list of patterns to lucifer with the hostname and IP address of a connecting customer. The connection is rejected when the patterns match. Split patterns with whitespace or a comma. |
| Auxiliary parameters | cord | Enter whatever boosted parameters from rsyncd.conf(5). |
13.9. S3
S3 is a distributed or amassed filesystem protocol compatible with Amazon S3 cloud storage. The FreeNAS® S3 service uses Minio to provide S3 storage hosted on the FreeNAS® organization itself. Minio likewise provides features beyond the limits of the basic Amazon S3 specifications.
Figure 13.9.ane shows the S3 service configuration screen and Table 13.ix.1 summarizes the configuration options. After configuring the S3 service, start it in .
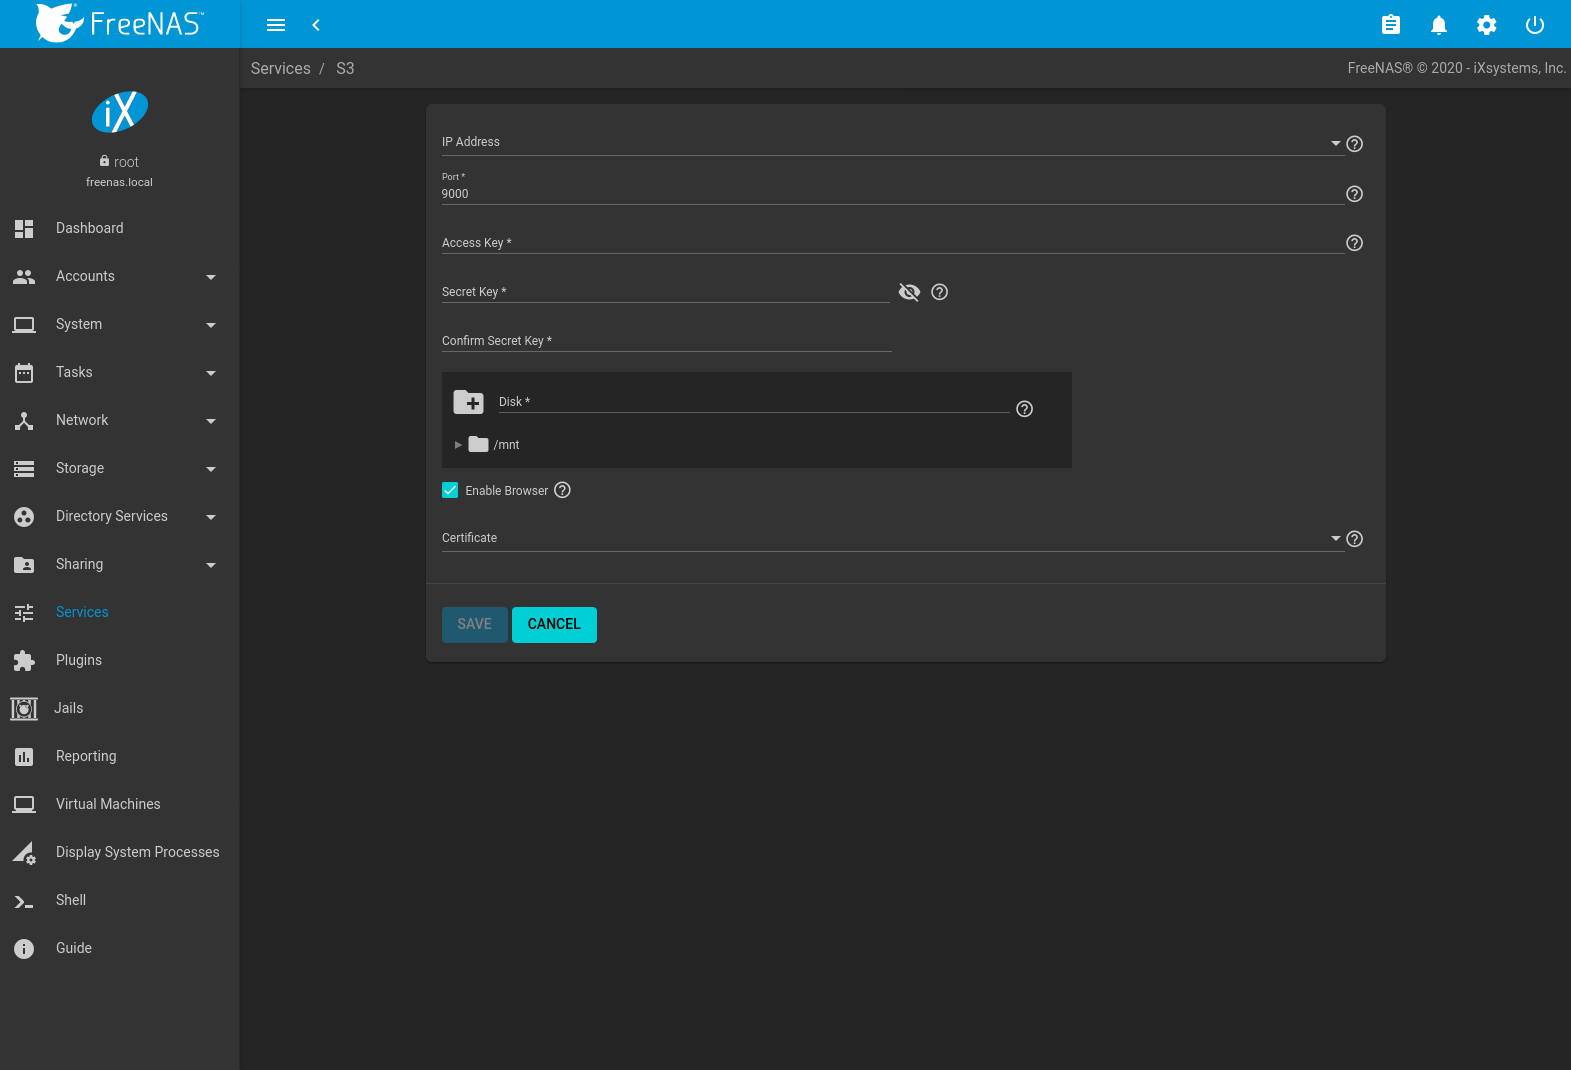
Fig. 13.ix.1 Configuring S3
| Setting | Value | Description |
|---|---|---|
| IP Accost | drop-down menu | Enter the IP address to run the S3 service. 0.0.0.0 sets the server to listen on all addresses. |
| Port | string | Enter the TCP port on which to provide the S3 service. Default is 9000. |
| Access Key | string | Enter the S3 user name. This username must contain merely alphanumeric characters and be betwixt 5 and 20 characters long. |
| Secret Primal | string | Enter the password to be used by connecting S3 systems. The central must contain only alphanumeric characters and be at least 8 but no more than xl characters long. |
| Confirm Underground Fundamental | string | Re-enter the S3 password to confirm. |
| Disk | scan | Directory where the S3 filesystem will exist mounted. Buying of this directory and all subdirectories is set to minio:minio. Create a separate dataset for Minio to avoid issues with conflicting directory permissions or ownership. |
| Enable Browser | checkbox | Set to enable the spider web user interface for the S3 service. |
| Certificate | driblet-downwardly bill of fare | Add together the SSL document to exist used for secure S3 connections. |
13.10. S.M.A.R.T.
S.M.A.R.T., or Self-Monitoring, Analysis, and Reporting Technology, is an industry standard for disk monitoring and testing. Drives can be monitored for condition and problems, and several types of self-tests can exist run to check the bulldoze health.
Tests run internally on the drive. Most tests tin run at the same fourth dimension as normal disk usage. Notwithstanding, a running test can greatly reduce bulldoze performance, then they should exist scheduled at times when the system is not busy or in normal utilize. It is very important to avoid scheduling disk-intensive tests at the aforementioned time. For instance, do not schedule Southward.M.A.R.T. tests to run at the same time, or preferably, even on the same days as Scrub Tasks.
Of particular interest in a NAS environment are the Short and Long South.Thou.A.R.T. tests. Details vary between drive manufacturers, merely a Short test generally does some basic tests of a bulldoze that takes a few minutes. The Long test scans the unabridged disk surface, and can take several hours on larger drives.
FreeNAS® uses the smartd(8) service to monitor S.M.A.R.T. information, including disk temperature. A complete configuration consists of:
- Scheduling when S.M.A.R.T. tests are run. Southward.M.A.R.T tests are created by navigating to , and clicking Add.
- Enabling or disabling S.M.A.R.T. for each disk member of a pool in . This setting is enabled by default for disks that support S.Chiliad.A.R.T.
- Checking the configuration of the S.K.A.R.T. service as described in this section.
- Starting the Southward.M.A.R.T. service in Services.
Effigy 13.10.1 shows the configuration screen that appears after going to and clicking (Configure).
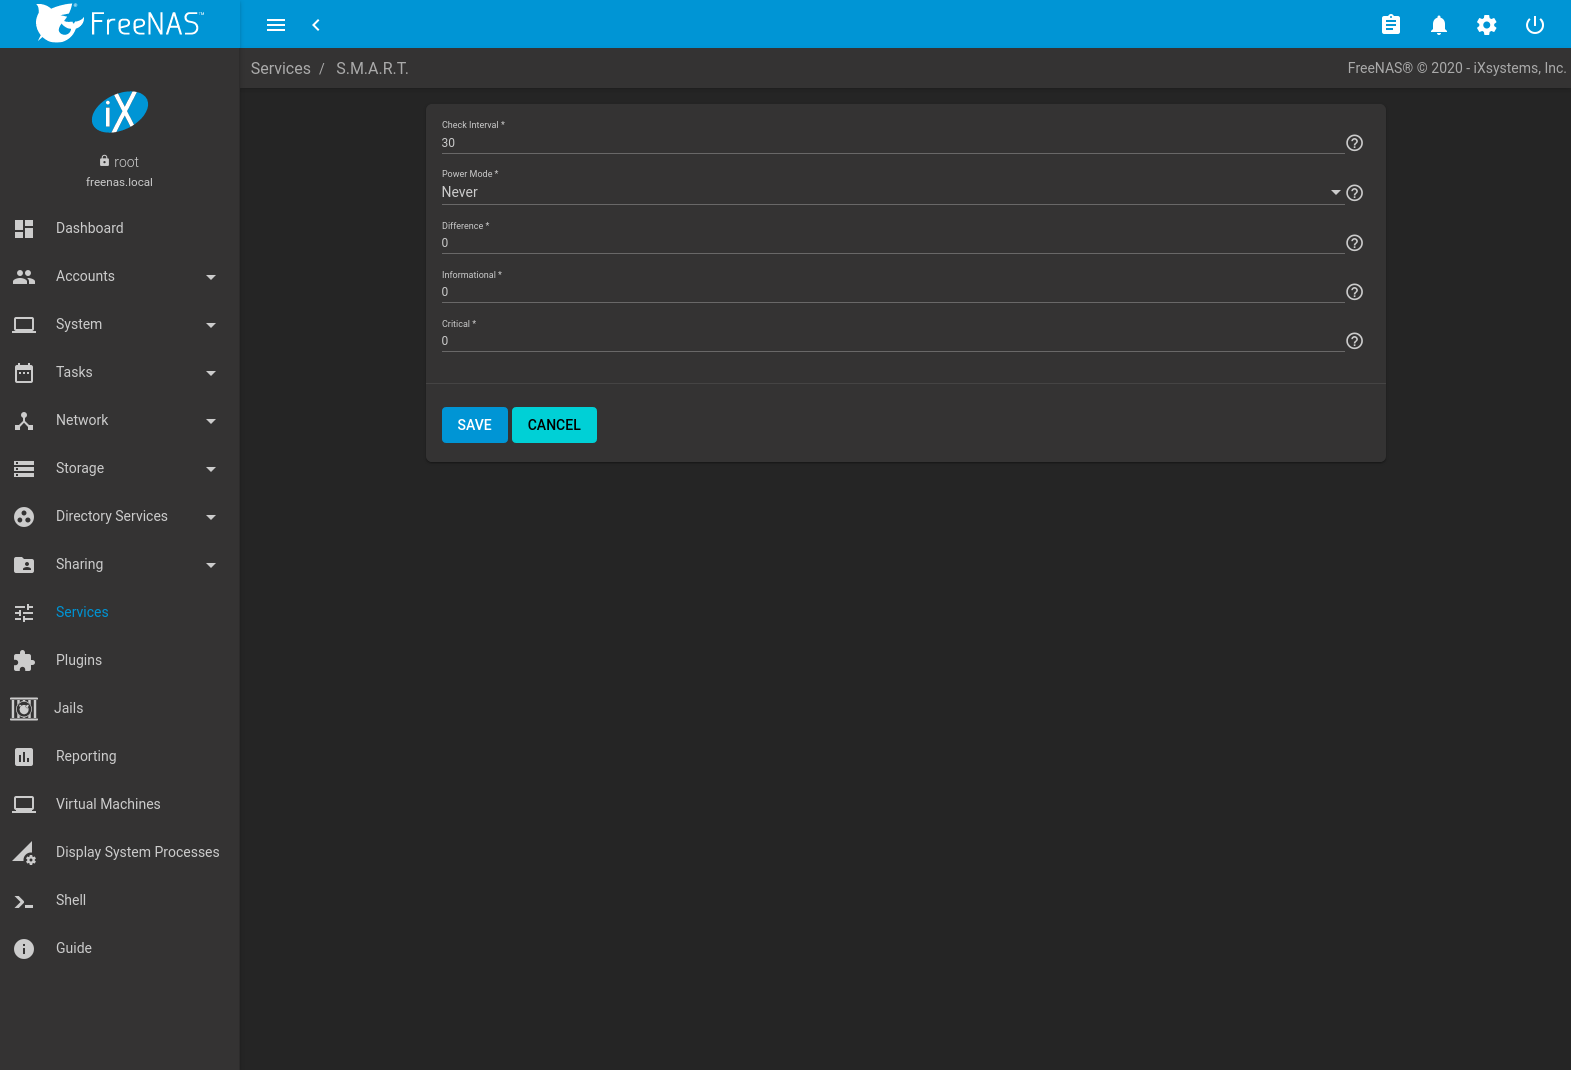
Fig. xiii.x.1 S.M.A.R.T Configuration Options
Notation
smartd wakes upwardly at the configured Check Interval. It checks the times configured in to see if a test must begin. Since the smallest time increment for a examination is an hour, it does not brand sense to set up a Bank check Interval value college than hr. For instance, if the Check Interval is ready to 120 minutes and the smart test to every hr, the exam will only be run every ii hours because smartd only activates every ii hours.
Table thirteen.10.1 summarizes the options in the S.Thousand.A.R.T configuration screen.
| Setting | Value | Clarification |
|---|---|---|
| Check Interval | integer | Define in minutes how often smartd activates to check if any tests are configured to run. |
| Power Manner | drop-down carte | Tests are but performed when Never is selected. Choices are: Never, Sleep, Standby, or Idle. |
| Difference | integer in degrees Celsius | Enter number of degrees in Celsius. Southward.Chiliad.A.R.T reports if the temperature of a drive has inverse past N degrees Celsius since the last report. Default of 0 disables this selection. |
| Informational | integer in degrees Celsius | Enter a threshold temperature in Celsius. S.M.A.R.T will message with a log level of LOG_INFO if the temperature is college than the threshold. Default of 0 disables this option. |
| Critical | integer in degrees Celsius | Enter a threshold temperature in Celsius. S.M.A.R.T will bulletin with a log level of LOG_CRIT and send an e-mail if the temperature is college than the threshold. Default of 0 disables this pick. |
13.eleven. SMB
Annotation
Subsequently starting the SMB service, it can have several minutes for the primary browser election to occur and for the FreeNAS® organisation to become available in Windows Explorer.
Effigy xiii.11.1 shows the global configuration options which utilize to all SMB shares. This configuration screen displays the configurable options from smb4.conf.
These options are described in Table 13.11.1.
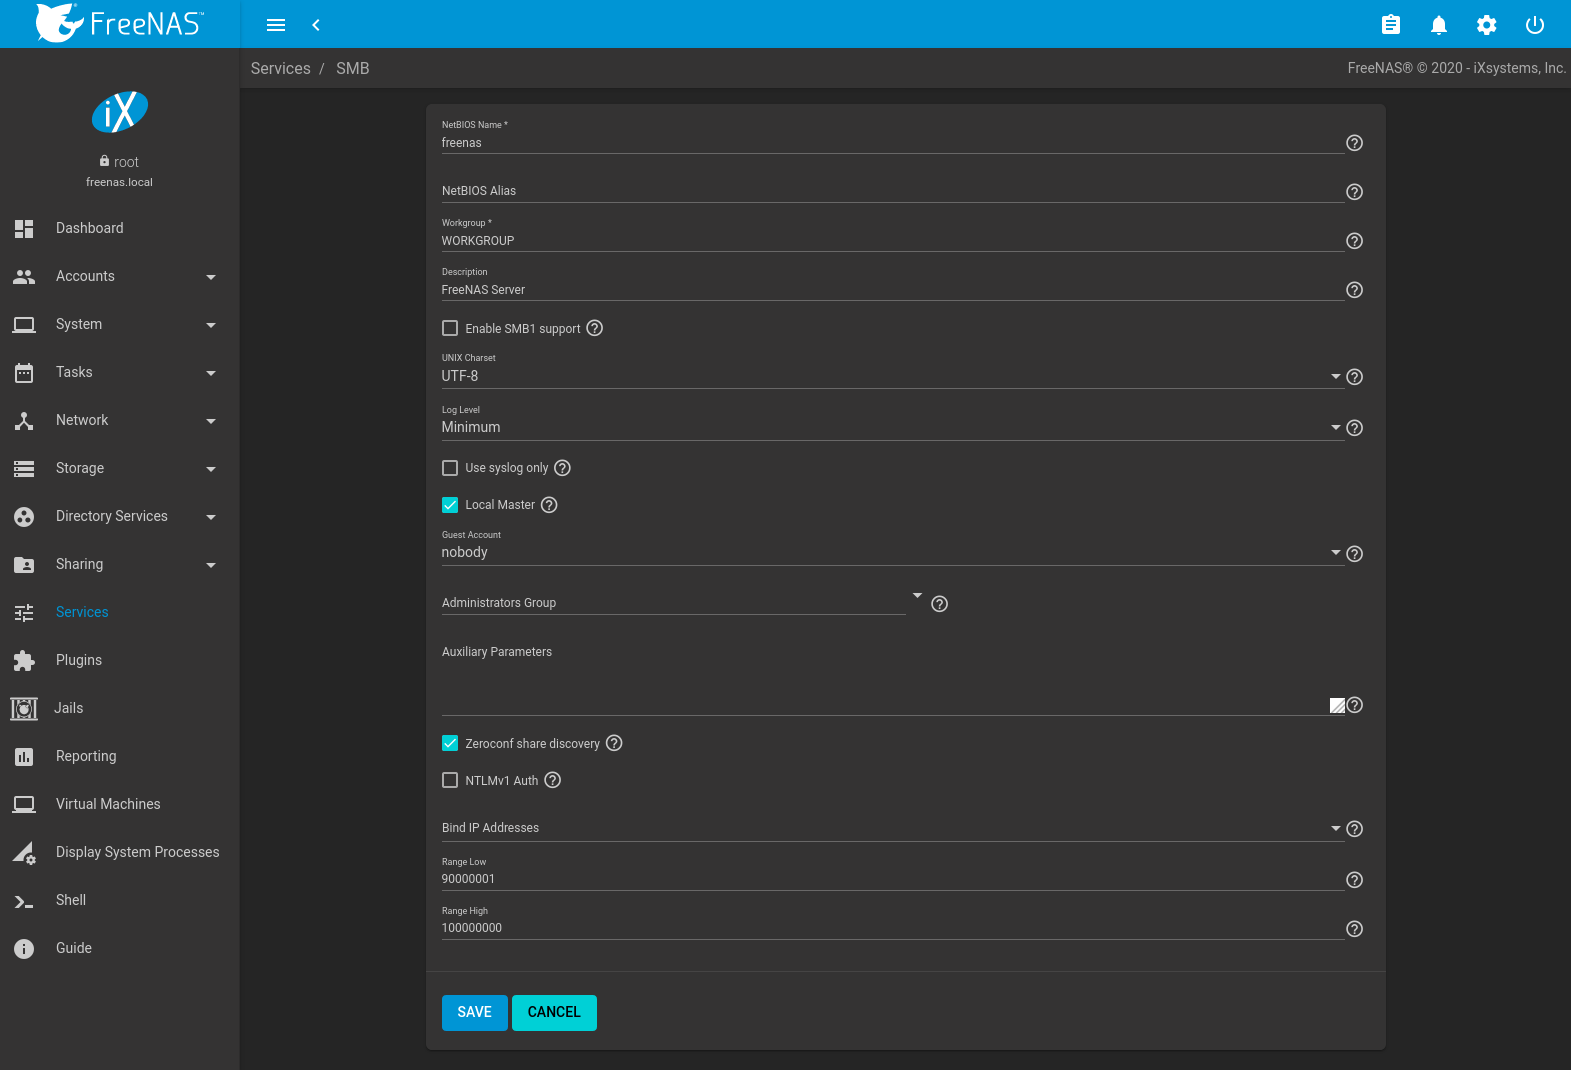
Fig. xiii.xi.1 Global SMB Configuration
| Setting | Value | Description |
|---|---|---|
| NetBIOS Name | string | Automatically populated with the original hostname of the system. Express to 15 characters. It must be different from the Workgroup name. |
| NetBIOS Alias | string | Enter whatever aliases, separated past spaces. Each alias cannot be longer than 15 characters. |
| Workgroup | string | Must match the Windows workgroup name. This setting is ignored if the Agile Directory or LDAP service is running. |
| Description | string | Enter a server clarification. Optional. |
| Enable SMB1 support | checkbox | Allow legacy SMB clients to connect to the server. Warning: SMB1 is not secure and has been deprecated by Microsoft. See Practise Not Use SMB1. |
| UNIX Charset | drop-down menu | Default is UTF-8 which supports all characters in all languages. |
| Log Level | drop-down carte du jour | Choices are Minimum, Normal, or Debug. |
| Apply syslog only | checkbox | Set to log authentication failures in /var/log/messages instead of the default of /var/log/samba4/log.smbd . |
| Local Master | checkbox | Ready to determine if the system participates in a browser ballot. Disable when network contains an Advertizement or LDAP server or Vista or Windows 7 machines are nowadays. |
| Guest Account | drop-down menu | Select the account to be used for guest admission. Default is nobody. Business relationship must have permission to access the shared pool or dataset. If Guest Business relationship user is deleted, resets to nobody. |
| Administrators Grouping | drib-down bill of fare | Members of this group are local admins and automatically have privileges to take ownership of any file in an SMB share, reset permissions, and administrate the SMB server through the Computer Management MMC snap-in. |
| Auxiliary Parameters | string | Add any smb.conf options non covered elsewhere in this screen. Run across the Samba Guide for additional settings. |
| Zeroconf share discovery | checkbox | Enable if Mac clients will exist connecting to the SMB share. |
| NTLMv1 Auth | checkbox | Set to allow NTLMv1 authentication. Required by Windows XP clients and sometimes by clients in later versions of Windows. |
| Demark IP Addresses | checkboxes | Static IP addresses which SMB listens on for connections. Leaving all unselected defaults to listening on all active interfaces. |
| Range Low | integer | Range Low and Range High set up the range of UID/GID numbers which this IDMap backend translates. If an external credential like a Windows SID maps to a UID or GID number exterior this range, the external credential is ignored. |
| Range Loftier | integer |
Changes to SMB settings take event immediately. Changes to share settings only take result after the client and server negotiate a new session.
Note
Practise not ready the directory proper noun cache size as an Auxiliary Parameter. Due to differences in how Linux and BSD handle file descriptors, directory name caching is disabled on BSD systems to improve performance.
xiii.11.1. Troubleshooting SMB
Exercise not connect to SMB shares as root , and practice not add together the root user in the SMB user database. There are security implications in attempting to do and so, and Samba 4 and afterward take measures to prevent such actions. This can produce auth_check_ntlm_password and FAILED with error NT_STATUS_WRONG_PASSWORD errors.
Samba is single threaded, so CPU speed makes a large difference in SMB performance. A typical 2.5Ghz Intel quad cadre or greater should exist capable of handling speeds in backlog of Gb LAN while low ability CPUs such as Intel Atoms and AMD C-30sE-350E-450 will not be able to achieve more about 30-40MB/sec typically. Recall that other loads such every bit ZFS will also require CPU resource and may cause Samba performance to be less than optimal.
Samba's write cache parameter has been reported to better write performance in some configurations and can exist added to the Auxiliary parameters field. Employ an integer value which is a multiple of _SC_PAGESIZE (typically 4096) to avoid retentivity fragmentation. This will increase Samba's retentiveness requirements and should not be used on systems with express RAM.
Windows automatically caches file sharing information. If changes are made to an SMB share or to the permissions of a pool or dataset existence shared past SMB and the share becomes inaccessible, log out and back in to the Windows system. Alternately, users can type internet use /delete from the command line to articulate their SMB sessions.
Windows also automatically caches login information. To require users to log in every time they access the system, reduce the cache settings on the client computers.
Where possible, avoid using a mix of instance in filenames as this can crusade confusion for Windows users. Representing and resolving filenames with Samba explains in more than particular.
If a detail user cannot connect to a SMB share, ensure their password does not comprise the ? character. If information technology does, have the user change the password and endeavor again.
If the SMB service will not start, run this command from Shell to see if there is an error in the configuration:
testparm /usr/local/etc/smb4.conf If clients have problems connecting to the SMB share, get to and verify that Server maximum protocol is set to SMB2.
Using a dataset for SMB sharing is recommended. When creating the dataset, make sure that the Share type is gear up to SMB.
Do non use chmod to attempt to fix the permissions on a SMB share as it destroys the Windows ACLs. The correct way to manage permissions on a SMB share is to manage the share security from a Windows system as either the owner of the share or a member of the grouping that owns the share. To exercise so, right-click on the share, click Properties and navigate to the Security tab. If the ACLs are already destroyed by using chmod, winacl can be used to fix them. Type winacl from Shell for usage instructions.
The Mutual Errors section of the Samba documentation contains additional troubleshooting tips.
The Samba Performance Tuning page describes options to improve performance.
Directory listing speed in folders with a large number of files is sometimes a problem. A few specific changes can help improve the performance. However, changing these settings can bear upon other usage. In general, the defaults are adequate. Practise not change these settings unless at that place is a specific demand.
- Log Level can also have a performance penalty. When non needed, information technology tin be disabled or reduced in the global SMB service options.
- Make Samba datasets case insensitive by setting Example Sensitivity to Insensitive when creating them. This ZFS property is only available when creating a dataset. It cannot be changed on an existing dataset. To convert such datasets, dorsum upward the data, create a new case-insensitive dataset, create an SMB share on it, set the share level auxiliary parameter example sensitive = true, and then copy the data from the quondam one onto it. Afterward the data has been checked and verified on the new share, the sometime one tin can be deleted.
- If nowadays, remove options for extended attributes and DOS attributes in the Auxiliary Parameters for the share.
- Disable as many VFS Objects as possible in the share settings. Many accept functioning overhead.
13.12. SNMP
SNMP (Simple Network Management Protocol) is used to monitor network-attached devices for conditions that warrant administrative attention. FreeNAS® uses Cyberspace-SNMP to provide SNMP. When starting the SNMP service, this port will exist enabled on the FreeNAS® system:
- UDP 161 (listens here for SNMP requests)
Available MIBS are located in /usr/local/share/snmp/mibs .
Figure xiii.12.1 shows the screen. Table xiii.12.1 summarizes the configuration options.
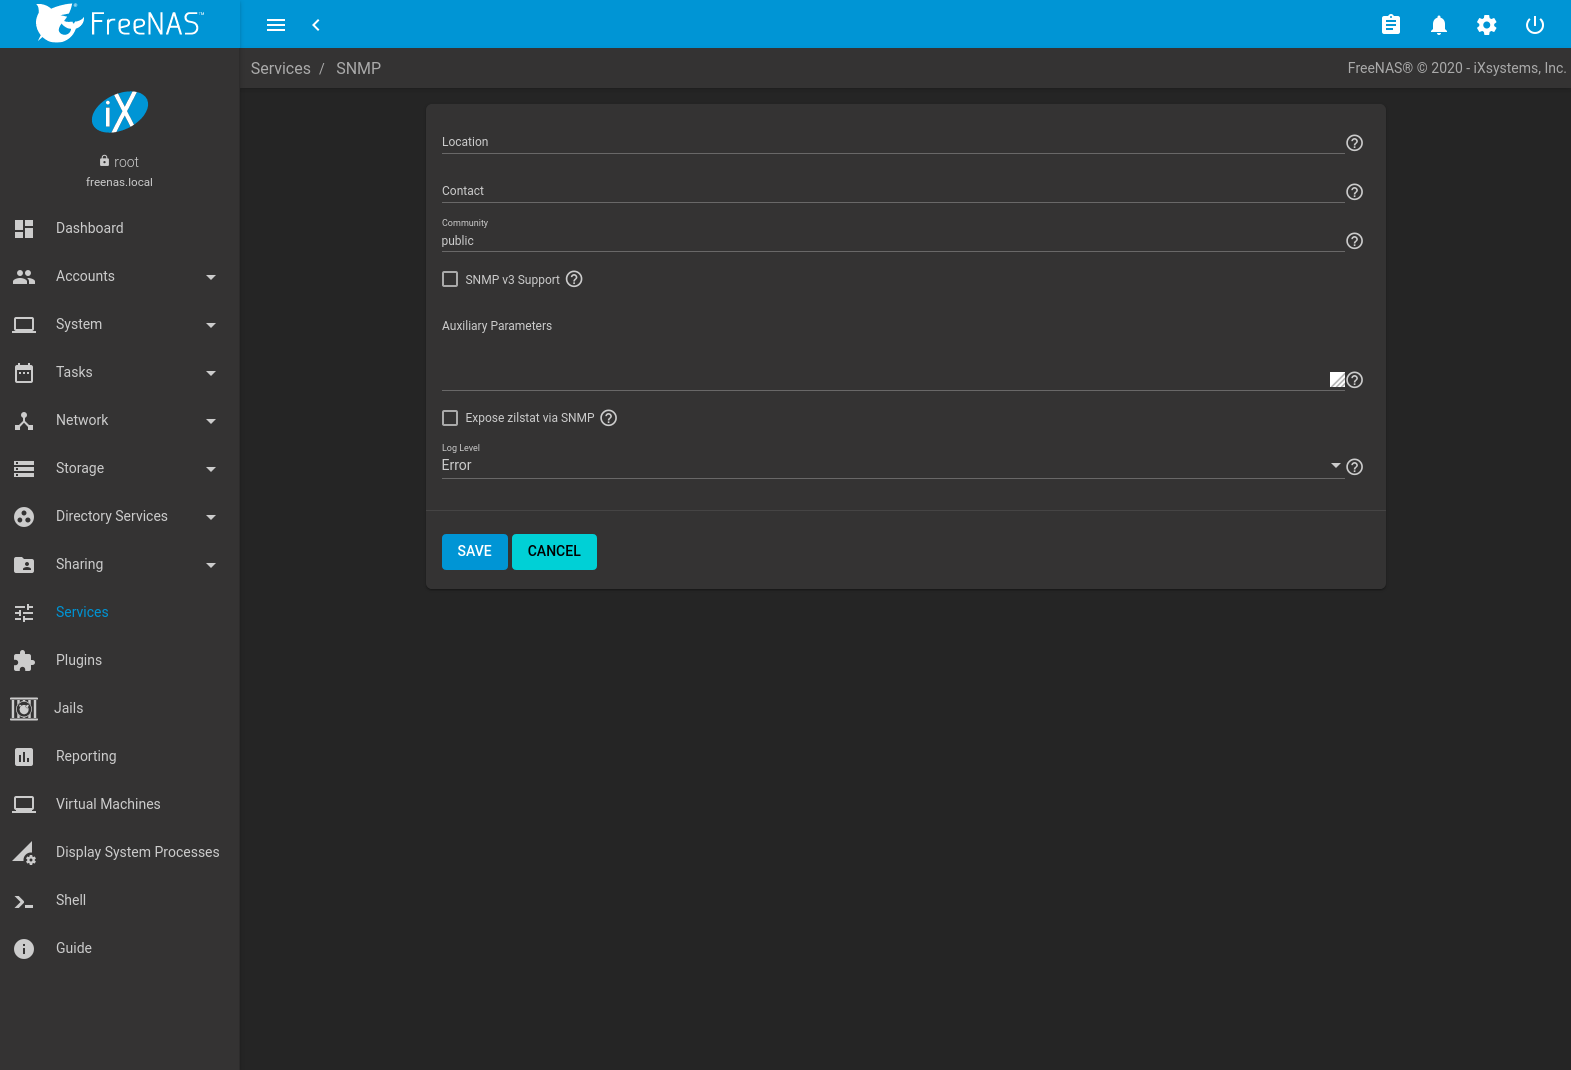
Fig. 13.12.1 Configuring SNMP
| Setting | Value | Clarification |
|---|---|---|
| Location | string | Enter the location of the organisation. |
| Contact | string | Enter an email accost to receive messages from the SNMP service. |
| Customs | string | Change from public to increment system security. Tin can only contain alphanumeric characters, underscores, dashes, periods, and spaces. This can be left empty for SNMPv3 networks. |
| SNMP v3 Support | checkbox | Set up to enable back up for SNMP version iii. See snmpd.conf(five) for more information well-nigh configuring this and the Authentication Blazon, Countersign, Privacy Protocol, and Privacy Passphrase fields. |
| Username | string | Only applies if SNMP v3 Support is set. Enter a username to register with this service. |
| Authentication Type | driblet-downward menu | Simply applies if SNMP v3 Back up is enabled. Choices are MD5 or SHA. |
| Password | string | Only applies if SNMP v3 Back up is enabled. Enter and confirm a password of at least viii characters. |
| Privacy Protocol | drop-down menu | Only applies if SNMP v3 Support is enabled. Choices are AES or DES. |
| Privacy Passphrase | string | Enter a separate privacy passphrase. Password is used when this is left empty. |
| Auxiliary Parameters | string | Enter additional snmpd.conf(5) options. Add together one option for each line. |
| Betrayal zilstat via SNMP | checkbox | Enabling this option may have pool performance implications. |
| Log Level | drop-downwards menu | Cull how many log entries to create. Choices range from the to the lowest degree log entries (Emergency) to the most (Debug). |
Zenoss provides a seamless monitoring service through SNMP for FreeNAS® called TrueNAS ZenPack.
13.13. SSH
Secure Beat (SSH) is used to transfer files securely over an encrypted network. When a FreeNAS® system is used as an SSH server, the users in the network must use SSH client software to transfer files with SSH.
This section shows the FreeNAS® SSH configuration options, demonstrates an example configuration that restricts users to their home directory, and provides some troubleshooting tips.
Figure xiii.xiii.one shows the screen.
Note
Afterwards configuring SSH, think to showtime information technology in Services by clicking the sliding button in the SSH row. The sliding button moves to the right when the service is running.
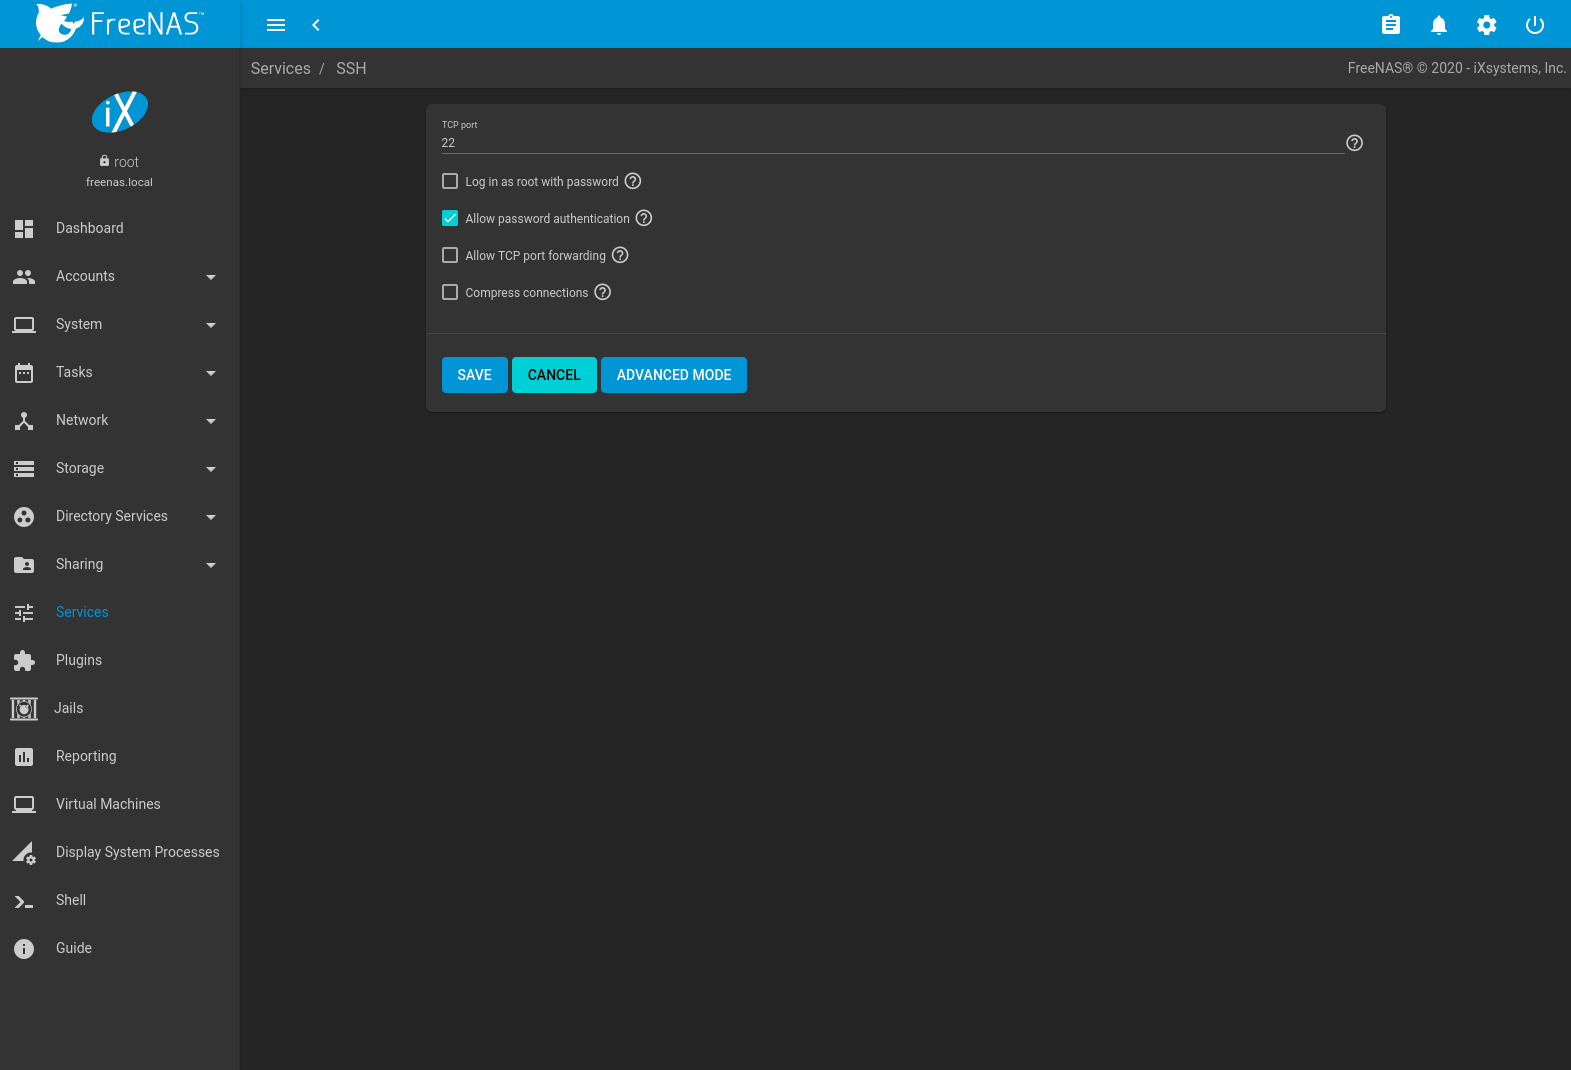
Fig. 13.xiii.1 SSH Configuration
Table xiii.13.1 summarizes the configuration options. Some settings are but available in Avant-garde Style. To run into these settings, either click the ADVANCED MODE push button, or configure the arrangement to always display these settings by enabling the Show advanced fields by default choice in .
| Setting | Value | Avant-garde Way | Description |
|---|---|---|---|
| Demark interfaces | selection | ✓ | By default, SSH listens on all interfaces unless specific interfaces are selected in this drop-down menu. |
| TCP port | integer | Port to open for SSH connection requests. 22 by default. | |
| Log in as root with countersign | checkbox | As a security precaution, root logins are discouraged and disabled by default. If enabled, password must be prepare for the root user in Users. | |
| Let countersign authentication | checkbox | Unset to require key-based authentication for all users. This requires boosted setup on both the SSH client and server. | |
| Allow kerberos authentication | checkbox | ✓ | Ensure Kerberos Realms and Kerberos Keytabs are configured and FreeNAS® tin can communicate with the Kerberos Domain Controller (KDC) before enabling this option. |
| Allow TCP port forwarding | checkbox | Set to permit users to featherbed firewall restrictions using the SSH port forwarding characteristic. | |
| Compress connections | checkbox | Gear up to attempt to reduce latency over slow networks. | |
| SFTP log level | drop-down menu | ✓ | Select the syslog(three) level of the SFTP server. |
| SFTP log facility | drop-down carte du jour | ✓ | Select the syslog(3) facility of the SFTP server. |
| Actress options | string | ✓ | Add any additional sshd_config(five) options not covered in this screen, one per line. These options are case-sensitive and misspellings can prevent the SSH service from starting. |
Here are some recommendations for the Extra options:
- Add
NoneEnabled noto disable the insecurenonecipher. - Increase the
ClientAliveIntervalif SSH connections tend to drop. -
ClientMaxStartupdefaults to 10. Increase this value when more concurrent SSH connections are required.
xiii.thirteen.1. SCP Only
When SSH is configured, authenticated users with a user account tin employ ssh to log into the FreeNAS® organization over the network. User accounts are created by navigating to , and clicking ADD. The user home directory is the pool or dataset specified in the Home Directory field of the FreeNAS® account for that user. While the SSH login defaults to the user home directory, users are able to navigate outside their home directory, which can pose a security hazard.
It is possible to permit users to apply scp and sftp to transfer files betwixt their local calculator and their abode directory on the FreeNAS® system, while restricting them from logging into the arrangement using ssh. To configure this scenario, go to , click (Options) for the user, and so Edit. Change the Vanquish to scponly. Repeat for each user that needs restricted SSH access.
Test the configuration from some other arrangement by running the sftp, ssh, and scp commands every bit the user. sftp and scp volition work but ssh will fail.
Annotation
Some utilities like WinSCP and Filezilla can featherbed the scponly shell. This section assumes users are accessing the arrangement using the control line versions of scp and sftp.
xiii.13.two. Troubleshooting SSH
Keywords listed in sshd_config(5) are case sensitive. This is important to recall when adding any Extra options. The configuration will not office every bit intended if the upper and lowercase messages of the keyword are not an exact match.
If clients are receiving "reverse DNS" or timeout errors, add an entry for the IP address of the FreeNAS® system in the Host name database field of .
When configuring SSH, always test the configuration as an SSH user account to ensure the user is limited past the configuration and they take permission to transfer files inside the intended directories. If the user account is experiencing problems, the SSH error letters are specific in describing the problem. Type this command within Crush to read these messages as they occur:
tail -f /var/log/letters Additional messages regarding authentication errors are establish in /var/log/auth.log .
13.14. TFTP
Footling File Transfer Protocol (TFTP) is a lite-weight version of FTP typically used to transfer configuration or kicking files betwixt machines, such every bit routers, in a local surroundings. TFTP provides an extremely limited gear up of commands and provides no hallmark.
If the FreeNAS® system volition be used to store images and configuration files for network devices, configure and start the TFTP service. Starting the TFTP service opens UDP port 69.
Effigy thirteen.14.ane shows the TFTP configuration screen and Tabular array 13.14.1 summarizes the available options.
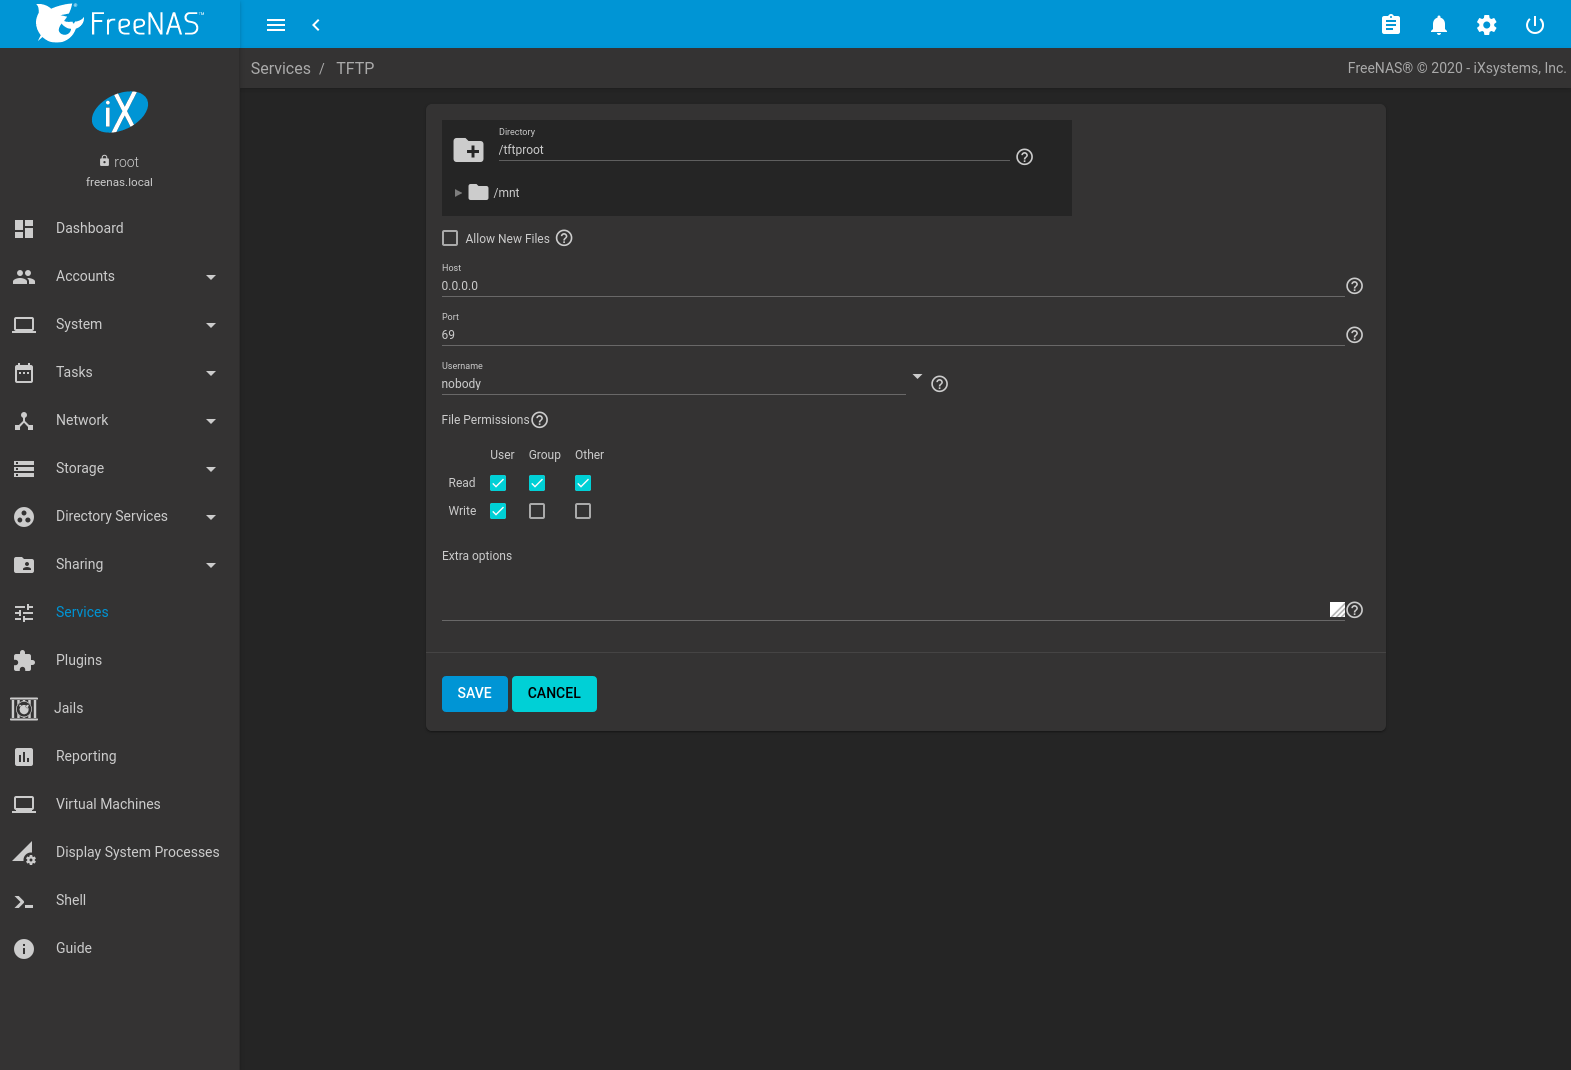
Fig. 13.fourteen.i TFTP Configuration
| Setting | Value | Clarification |
|---|---|---|
| Directory | Scan push button | Browse to an existing directory to exist used for storage. Some devices require a specific directory name, refer to the device documentation for details. |
| Allow New Files | checkbox | Set when network devices demand to ship files to the system. For instance, to back up their configuration. |
| Host | IP address | The default host to use for TFTP transfers. Enter an IP accost. Example: 192.0.ii.1. |
| Port | integer | The UDP port number that listens for TFTP requests. Instance: 8050. |
| Username | drop-downward menu | Select the business relationship to use for TFTP requests. This account must have permission to the Directory. |
| File Permissions | checkboxes | Set permissions for newly created files. The default is anybody can read and only the owner tin write. Some devices require less strict permissions. |
| Extra options | string | Add more than options from tftpd(8) Add together one option on each line. |
13.15. UPS
FreeNAS® uses NUT (Network UPS Tools) to provide UPS back up. If the FreeNAS® system is connected to a UPS device, configure the UPS service in .
Figure 13.15.1 shows the UPS configuration screen:
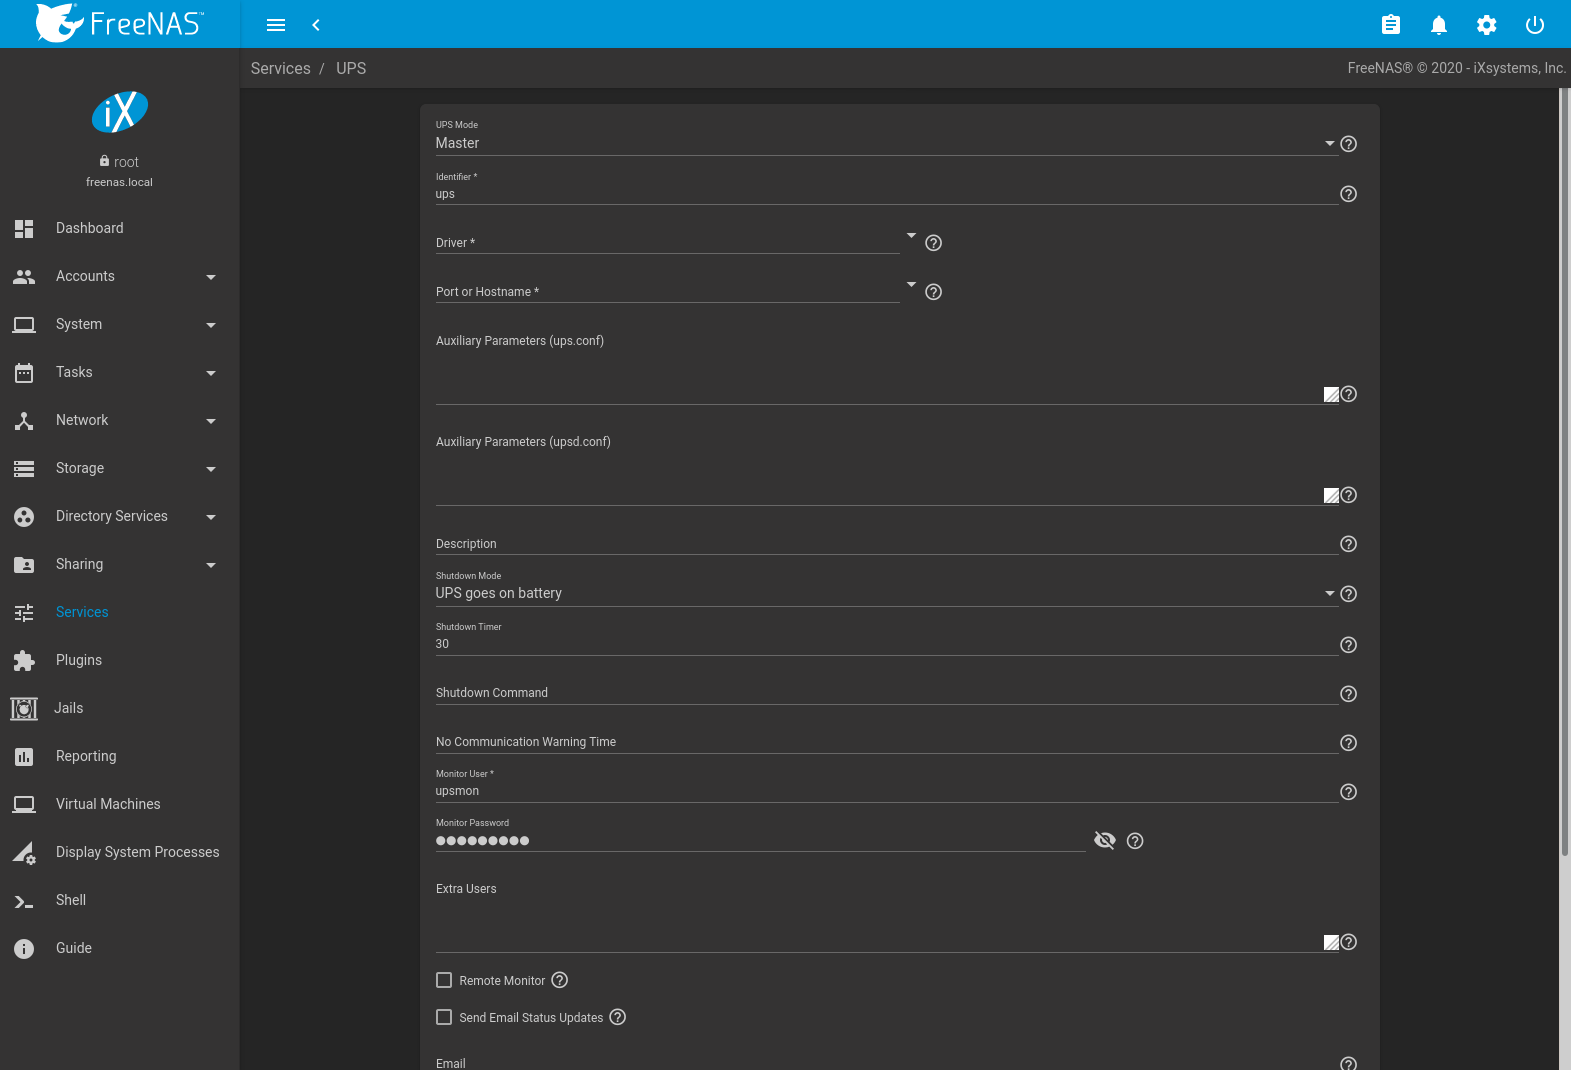
Fig. 13.15.ane UPS Configuration Screen
Tabular array 13.15.1 summarizes the options in the UPS Configuration screen.
| Setting | Value | Clarification |
|---|---|---|
| UPS Mode | drop-down menu | Select Main if the UPS is plugged directly into the system serial port. The UPS will remain the last item to shut down. Select Slave to have the system close down before Chief. |
| Identifier | cord | Required. Draw the UPS device. Can contain alphanumeric, catamenia, comma, hyphen, and underscore characters. |
| Driver / Remote Host | combo-box | Required. For a list of supported devices, encounter the Network UPS Tools compatibility list. The field suggests drivers based on the text entered. To search for a specific driver, begin typing the name of the driver. The search is case sensitive. The Driver field changes to Remote Host when UPS Mode is set to Slave. Enter the IP address of the organization configured equally the UPS Primary organisation. Run across this post for more details most configuring multiple systems with a unmarried UPS. |
| Port or Hostname | driblet-downwards carte | Serial or USB port connected to the UPS. To automatically observe and manage the USB port settings, open the drop-downwards menu and select auto. If the specific USB port must be chosen, encounter this annotation about identifing the USB port used past the UPS. When an SNMP driver is selected, enter the IP address or hostname of the SNMP UPS device. Port or Hostname becomes Remote Port when the UPS Style is prepare to Slave. Enter the open network port number of the UPS Main system. The default port is 3493. |
| Auxiliary Parameters (ups.conf) | string | Enter any additional options from ups.conf(5). |
| Auxiliary Parameters (upsd.conf) | cord | Enter whatsoever additional options from upsd.conf(5). |
| Description | string | Optional. Draw the UPS service. |
| Shutdown Manner | driblet-down carte du jour | Choose when the UPS initiates shutdown. Choices are UPS goes on battery and UPS reaches low bombardment. |
| Shutdown Timer | integer | Select a value in seconds for the UPS to look earlier initiating shutdown. Shutdown will non occur if the power is restored while the timer is counting down. This value only applies when Shutdown Mode is set to UPS goes on battery. |
| Shutdown Command | string | Enter the command to run to close downwardly the calculator when battery ability is low or shutdown timer runs out. |
| No Communication Alarm Time | string | Enter a value in seconds to await before alerting that the service cannot attain any UPS. Warnings proceed until the state of affairs is fixed. |
| Monitor User | string | Required. Enter a user to acquaintance with this service. The recommended default user is upsmon. |
| Monitor Countersign | string | Required. Default is the known value fixmepass. Change this to enhance system security. Cannot contain a infinite or # . |
| Actress Users | string | Enter accounts that have administrative admission. See upsd.users(v) for examples. |
| Remote Monitor | checkbox | Set for the default configuration to listen on all interfaces using the known values of user: upsmon and password: fixmepass. |
| Ship Email Status Updates | checkbox | Set to enables the FreeNAS® organisation to send email updates to the configured Email field. |
| Electronic mail | email address | Enter any email addresses to receive status updates. Separate multiple addresses with a semicolon ( ; ). |
| Email Subject | string | Enter a field of study line for email status updates. |
| Ability Off UPS | checkbox | Prepare for the UPS to ability off after shutting downward the FreeNAS® system. |
| Host Sync | integer | Enter a time in seconds for UPSMON(8) to wait in master mode for the slaves to disconnect during a shutdown. |
Note
For USB devices, the easiest way to decide the correct device proper name is to enable the Show console messages option in . Plug in the USB device and look for a /dev/ugen or /dev/uhid device proper name in the console letters.
Some UPS models might be unresponsive with the default polling frequency. This tin can show in FreeNAS® logs as a recurring error similar: libusb_get_interrupt: Unknown error .
If this error occurs, decrease the polling frequency by calculation an entry to Auxiliary Parameters (ups.conf): pollinterval = 10 . The default polling frequency is two seconds.
upsc(eight) can be used to get status variables from the UPS daemon such as the current accuse and input voltage. It can be run from Shell using this syntax:
The upsc(8) homo page gives some other usage examples.
upscmd(8) can exist used to transport commands straight to the UPS, assuming the hardware supports the control existence sent. Only users with administrative rights can apply this control. These users are created in the Extra users field.
13.15.i. Multiple Computers with One UPS
A UPS with adequate capacity can power multiple computers. Ane calculator is connected to the UPS data port with a serial or USB cablevision. This master makes UPS status bachelor on the network for other computers. These slave computers are powered by the UPS, but receive UPS status data from the master reckoner. See the NUT User Transmission and NUT User Manual Pages.
xiii.16. WebDAV
The WebDAV service tin can be configured to provide a file browser over a web connexion. Earlier starting this service, at least one WebDAV share must be created by navigating to , and clicking ADD. Refer to WebDAV Shares for instructions on how to create a share and connect to information technology after the service is configured and started.
The settings in the WebDAV service use to all WebDAV shares. Figure 13.16.1 shows the WebDAV configuration screen. Table xiii.16.ane summarizes the available options.
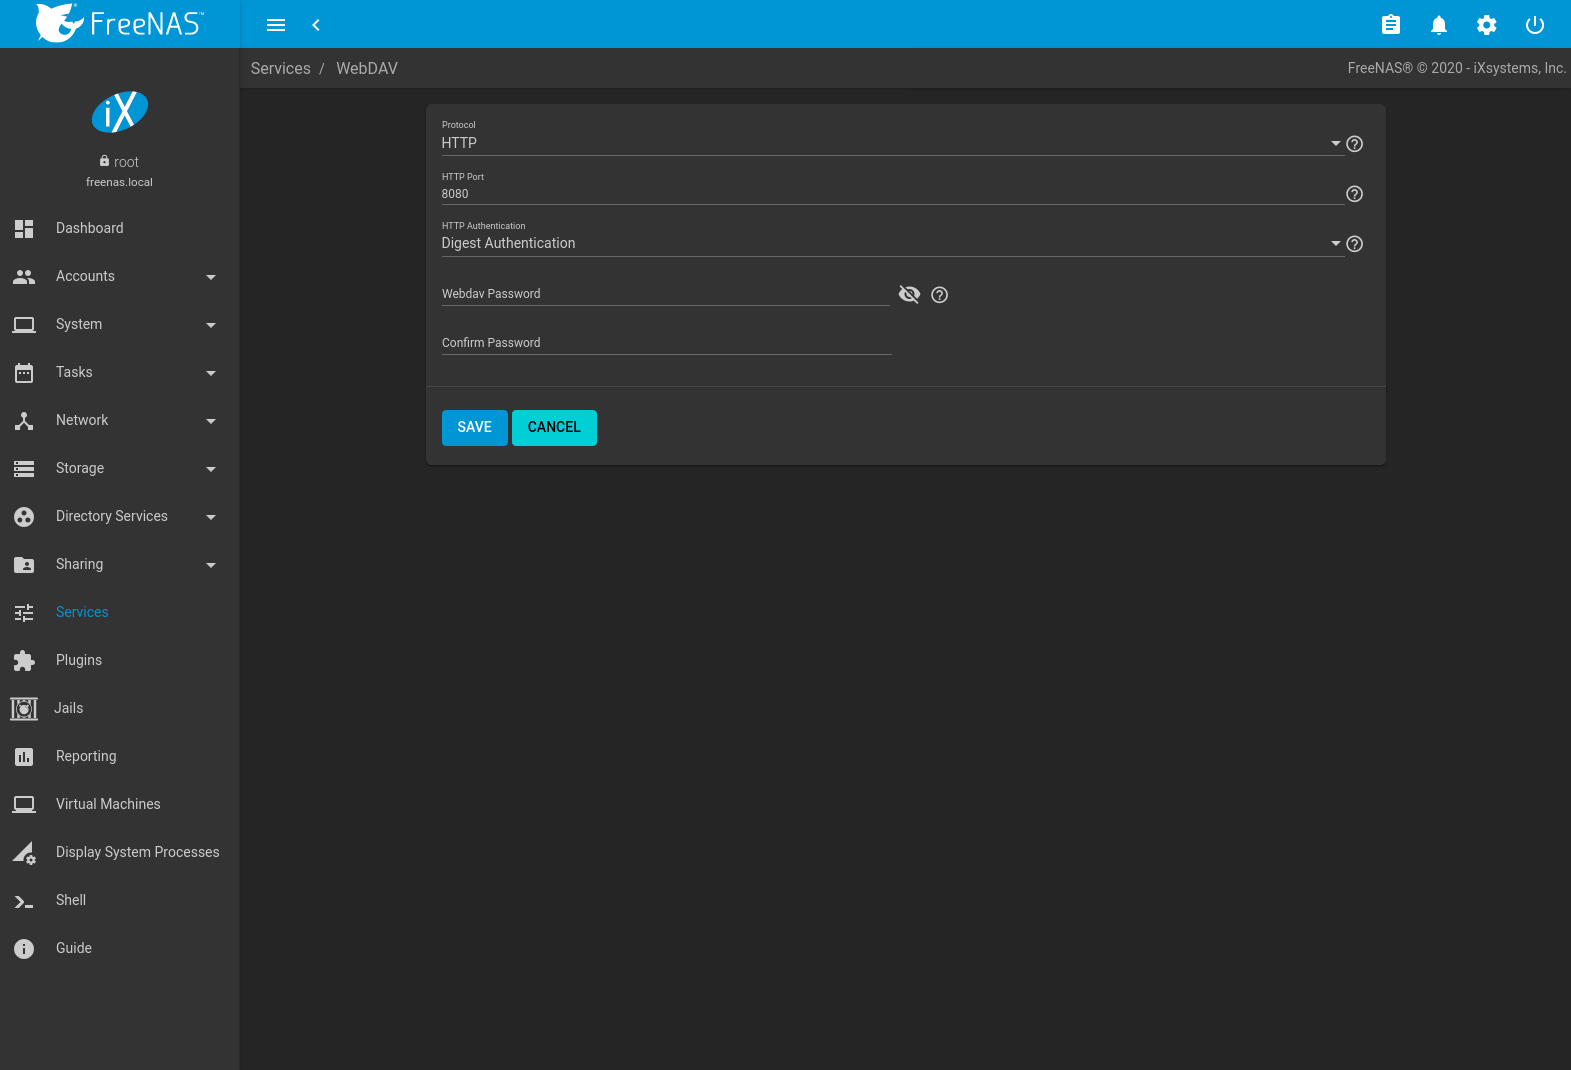
Fig. thirteen.xvi.i WebDAV Configuration Screen
| Setting | Value | Description |
|---|---|---|
| Protocol | drop-down carte | HTTP keeps the connectedness unencrypted. HTTPS encrypts the connexion. HTTP+HTTPS allows both types of connections. |
| HTTP Port | string | Specify a port for unencrypted connections. The default port 8080 is recommended. Do non use a port number already existence used past another service. |
| HTTPS Port | string | Specify a port for encrypted connections. The default port 8081 is recommended. Do not utilize a port number already being used by some other service. |
| Webdav SSL Certificate | drop-down card | Select the SSL certificate to be used for encrypted connections. To create a certificate, use . |
| HTTP Authentication | driblet-down menu | Choices are No Authentication, Basic Authentication (unencrypted) or Digest Authentication (encrypted). |
| Webdav Countersign | string | Default is davtest. Change this countersign as it is a known value. |
Source: https://www.ixsystems.com/documentation/freenas/11.3-U1/services.html
0 Response to "Freenas Ftp Cannot Create Folder but Can Upload"
Post a Comment